hen~housekeeping, a walk, a book cover

Wednesday was a gorgeously warm day for us for this time of year so it seemed a good idea to clean the henhouse. Out with the old and in with fresh new shavings for the floor and nest boxes. When I've finished the hens slowly make their way back in, stepping gingerly and looking all around as if they appreciate a 'clean house' and the fresh pine scent of the shavings.
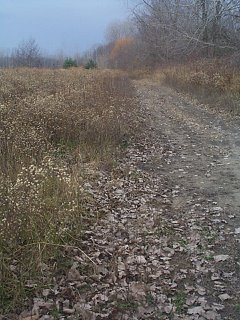
Afterwards, I took a walk up the lane and a couple pictures. A bit bleak looking, but still beautiful I think...

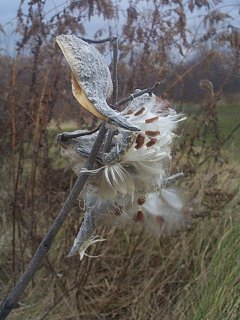
Most of the milkweed pods have burst open and been scattered by the wind. I remember how much I loved these as a kid ~ opening them up to see the neat rows of seeds and all that white fluff...

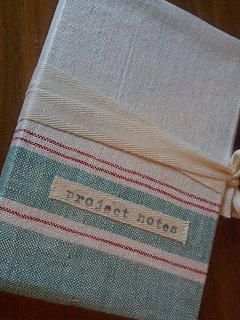
I really like the book covers in Crafting Vintage Style by Christina Strutt, so I decided to make one the other night. It didn't take long. I used some of the same linen tablecloth that I had used for the potholder.

With some cotton twill tape I made a label and ties to close it. Now I have a place to keep pictures and notes of the projects I make.

Thanks to you all for your visits and kind comments!

M1R and M1L Gusset Increases

FINALLY!!!


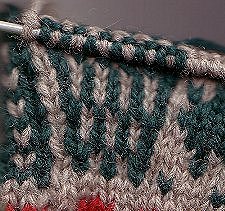
Here is a close-up of the thumb gusset for the current mittens. Unfortunately this is the best I can do as my scanner is giving up the ghost. This photo shows the M1 Right increase on the right side and the M1 Left increase on the left side. It should be an almost invisible increase.


HERE's a good post that includes videos on how to do the Make One Left (M1L) and Make One Right (M1R) Increases. I know it is confusing because some knitting instructions call the backwards loop increase (seen HERE - I only use this one for casting on for glove fingers) an M1 and I've even seen the "Knit into the Front and Back of a Stitch" increase called an M1 but the M1Left and M1 Right increases I do on either side of a thumb gusset are different.

Here are the directions from Vogue Knitting.

Make One: Version A (Right Leaning) Insert the left needle from back to front into the horizontal strand between the last stitch worked and the next stitch on the left needle. Knit this strand through the front loop to twist the stitch.

Make One: Version B (Left Leaning) Insert the left needle from front to back into the horizontal strand between the last stitch worked and the first stitch on the left needle. Knit this strand through the back loop to twist it.

To help me remember the difference between the two increases I differentiate the left and right increases by "easy" and "hard". For some reason it is easier to do the Make One Left increase and it is more difficult to work your needle into the twisted loop for the Make One Right increase. I remember which one is which by always doing the "hard" (right-leaning) M1 first on the side of a gusset and the "easy" (left-leaning) one second. Nancie Wiseman's finishing book says you'll know if you did one of these two increases wrong if you make a little hole.

For stranded colorwork mittens or gloves, I always make the increases in the same color yarn - usually whatever the color is used for the outline of the gusset in the pattern chart. For the right leaning M1 on the right side of the gusset, I do the increase on the horizontal strand BEFORE the first stitch of the gusset. For the left leaning M1 on the left side of the gusset I do the increase on the horizontal strand AFTER the last stitch of the gusset. Use stitch markers on your needles to determine exactly where the gusset stitches are located.
There are a couple ways I've increased stitches for thumb gussets in mittens or gloves. The most unusual method I ever used it was for Nancy Bush's Vanalinn gloves in A Gathering of Lace. The pattern stated to do a YO just on the palm side of the gusset. To me it really looked like holes in my knitting.

For my most recent Selbu gloves I strayed from my usual method and used a M1 left leaning increase on the right side of the gusset and a M1 right leaning increase on the left side of the gusset. While it is more noticeable, I'm not sure that is an asset in a thumb gusset. M1 increases look best if done every three rows or more.


I'm back to my usual method which is to do a M1 that slants to the right on the right hand side of the gusset and a M1 that slants to the left on the left side of the gusset.


This is the Herrevott No. 4 mitten from the Norwegian Selbustrikk book done in Nature Spun sport weight and size 0 (US) dpns. This results in a snug knitted fabric which I prefer for mittens.

some reading & apple cake

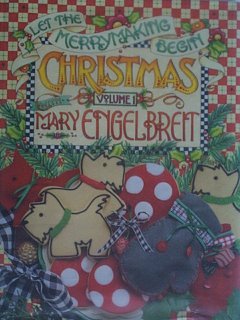
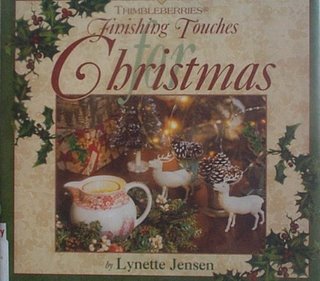
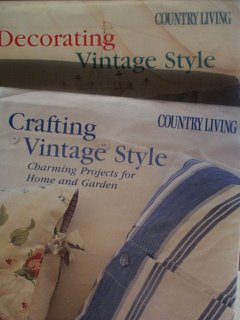
No Christmas decorating going on here yet, as I probably won't start until next week. Instead I'm spending this week giving the main rooms a semi-deep cleaning before I start hauling up the decorations from the basement. I've been working on gifts that I am sewing/knitting and gathering decorating/gift/recipe ideas. I picked up some books from the library....
ME's book is full of good craft ideas like the paper cones I've been wanting to make and good recipes ~ I would like to try the Winter Breakfast Frittata and definitely the French Apple Tart!
The Thimbleberries book is full of great decorating ideas. I love the mantle done with greenery, dried hydrangeas, and pine cones. Maybe I will do that with the hydrangea blossoms I dried...

I also picked up two Country Living books by Christina Strutt, which I had never seen. I love the vintage style decorating, and the Crafting Vintage Style book shows how to make many of the items shown in the Decorating Vintage Style book. I think some of the projects would make nice gifts like the ~ scented sachets, linen-covered journal, and gardener's apron.

I have a wonderful supply of apples to use, so I made this apple cake for morning tea today. The recipe is below if you would like to try it ~ it's a favorite here!

Enjoy!


Apple Loaf Cake

1 3/4 cups all-purpose flour

1/2 cup sugar

3 teaspooons baking powder

1/2 cup butter, cut up

1/2 pound cooking apples, peeled, cored, & finely chopped (1 1/4 cups)

1 egg

1/2 cup milk

  • Butter and flour a 8.5 x 4.5 x 3.75 -inch loaf pan; butter & flour. Preheat oven to 350 degrees F.
  • Sift flour, sugar & baking powder into large bowl. With pastry blender or knives, cut in butter until mixture resembles fine meal. (I like to use my food processor ~ just pulse, don't overdo). Toss chopped apple in flour mixture. Set aside.
  • In small bowl, whisk together egg & milk until blended. Stir into apple mixture until mixed. (Batter will be stiff.) Spread batter evenly in dish.
  • Bake at 350 degrees F for 45 to 50 minutes until skewer inserted in center comes out clean. Remove from oven. Cool on rack 10 minutes. Remove from dish. Cool on rack. Yield: 12 servings

Lotrrh gets sleeves!


The sleeves I have attached twice. The first time I crocheted but the purple dk just didnt look right against the wotsit wool. So I knited two square 14 by 13 in 25mm needles.

I stitched the sleeve seam up with the last of the hanging yarn. Then attached the whole sleeve using a 15mm crochet hook, the join looks like blanket stitch and this works as I wanted it to look hand made. ( Old'y world'y stiched on in the woods type thing)

The sleeve will grow over night as I used such large needle so It will need to hang for a while. Then I need to work out how to make the sleeve to hang down as if into a point. floaty would best describe.

H is for Harry


This little bear was from Ikea 20kr (a couple of quid) and I made him a little tank top with yet another attempt of doing the Intarcia(letter H) a different way.

This time I added a yarn and used the existing yarn together to make the letter, but the wool randomly twists so the letter H is not so clear. (practice make perfect)

It will still make a nice personalized gift for a friend of the family who had a baby boy a few months back, baby Harry.


Here are my friend Joelle's horses waiting impatiently for someone to give them some sugar cubes. Yoshi, the leopard Appaloosa, actually came with their house when they bought it.

I've had questions in the comments about finding solid colored sock yarn. Once upon a time in a land far far away you could buy wonderful colors of sock and fingering weight yarns at many locations. Currently I can't think of a single sock yarn that comes in a lot of solid colors and good luck finding any other type of non-washable non-Shetland fingering weight wool yarn. (This is partly the reason I plan my designs in thicker weights of yarn.) Here's what I currently buy:

Worsted weight - I use Elann's Peruvian Highland Wool and Knitpick's Wool of the Andes because they're cheap. I especially stock up on neutral colors (black, white, gray, cream, etc.) in these two lines of yarn. I also need really bright colors so for that I buy the slightly more expensive Cascade 220. If I had an unlimited budget I'd probably just use Cascade 220 exclusively because I love the saturated colors and the softness. Alas, when you like to knit with many colors you end up buying more yarn than other types of knitters so I work to keep costs down.

Sport weight - I'm currently attempting to increase my sport weight stash. I still have quite a bit of Nature Spun in many colors but I need some new sources. I just bought some Knitpick's Telemark (I've read it can bleed) to test and am still searching for other lines in this weight.

Fingering weight/sock yarns - For sock yarns I've been buying Knitpicks Essentials in their limited colors - also the Calzinia Calzeterria from Smiley's (some colors do bleed). I also bought a ton of Kroy on sale in wonderful fluorescent colors at Herrschner's last year when those colors were being discontinued. For non-washable fingering weight wool yarn I can only think of Nature Spun. I just ordered some from Paradise Fibers (it was back-ordered) and I don't know where else to find all the colors.

I'm very worried Nature Spun is also going to be discontinued and I have no clue what I'd use for finer gloves in colorwork other than sock yarn. I have a stash of Shetland yarns in this weight but it is pretty scratchy and I can't personally wear it without itching. Knitpick's Palette seems a bit softer than Shetland and I just bought some to try for a pair of men's gloves.

Let me know if you have any other suggestions for yarn brands that come in a lot of (more than 40) colors. I regularly do a visual check of my stash of yarns to see if there are any basic colors I need in each weight and then try to stock up. Web's big year-end sale is coming up soon so I will probably see what they have to offer and stock up there. They always have Cascade 220 in limited colors on sale and hopefully this year they'll have some sock yarns I like.

monday


After a bit of fumbling I finished the squirrel favors the night before Thanksgiving and filled them with dark chocolate truffles. I was thankful that my brother was here for dinner with us. The turkey and dressing came out great, the homemade dinner rolls were fresh from the oven, and we ended with pumpkin and apple pies with whipped cream.

We have been enjoying sunshine and temperatures up to 60 degrees, very different from the snow we had last Thanksgiving. I spent Sunday taking a long walk outside and gathering some pinecones, rosehips, etc. for making some decorations. I also need to gather greens for making my Advent wreath for next Sunday...this weather will not last much longer.

Herrevante, No. 13

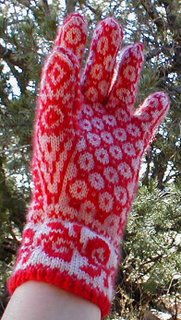
Unfortunately this outdoor photo of the gloves turned out somewhat ghostly due to the time of day.


These are the Herrevante No. 13 from the Norwegian Rauma Selbustrikk booklet (available through Arnhild ) knitted using size 2 dpns and some of my vintage Nylamb yarn. I really love Nylamb for gloves.


If you have the booklet, there is a tiny chart error. On Handleadd alt 5, the chart on the bottom of page 13, go to the far right of the chart and count up 10 squares and color in the square. The charts are clear and well marked and you really don't need to know Norwegian to knit these items.

Maddie's Hat


Baby Maddie's beany hat

This weekend I knitted the part two of the sparkly wool the (left over) a mother and daughter xmas gift. Doing well, but not sure I am gonna be able to knit all the hats I want to by Christmas.

But i'll try. (Won't be buying this wool again the sparkly is so hard to stitch the ends in and it just knots.)

Bodice (Lotrrh)


LOTRRH

So far the progress is the bodice and then I have laced up the back part so that it will have a higher neckline.

The wool texture reminds me of Wotsits a Uk brand of crisps. The wine colours work well for the theme it is being designed for.(Angela very your aura colour, needs orange)

The bodice was knitted in one peice with a 20mm and a 15 mm needle one of each.

LOTRRH


Plans

Lotrrh this was my quick sketch and the rough pattern I will work to.

Some times I just start and go where it takes me, and other time I sketch the idea down and attmept to work with it.

I have completed the bodice. Tricky stitching all the edges in as the wool is fat and thin so uneven to sow in.

On the pattern the different sizes cross hatchs show the different size crochet hooks I will use or fatter the needle size.

Me!


Still not sure in my lettering and they are all coming out different size's and I guess this is to do with the different yarns as I am makine then all the same way.

But this works as the peice that I am making them for is about weight. So the varying sizes will work well.

Mind you they are getting me some funny starring look's whist sipping my coffee and knitting in my local coffee shop.
If you've been saying to yourself, "Why doesn't she ever have any photos of horses on her blog?", you'll be in luck this weekend. We're spending Thanksgiving with our friends who have three photogenic horses (and a psychotic woman-hating rooster). I promise to risk my life and take some photos. The Norwegian gloves are finished and I'll have DH take some photos of my hands modeling the gloves as well.

I'm thankful all I had to do for a wonderful Thanksgiving feast was bake some bread.


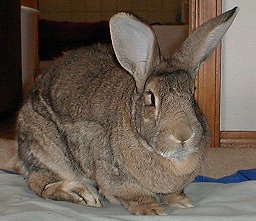
Peaches is thankful the photo below was selected for the 2007 Colorado House Rabbit Society calendar. She is Miss August.


She is also thankful that there are some delicious items in our CSA box this week from Farmer Monte.


HAPPY THANKSGIVING!

This week I've been mostly knitting!


This week I have been trying out this fabulous yarn, its like rat's tales. I mean this in the way that it goe's from fat to thin. Lush in colour a winter wine. Looks like I spun it myself!

I have designed a dress that's 'Lord of the Rings' the Arwin character! The beautiful Liv Tyler, meets Kevin Costner staring in the 90's 'Every thing i do i do it for you!' Robin Hood!

I have a locksley cross my husband and I brought on our 5th wedding anninversry and that with the yarn was the inspiration for this peice.

The yarn a bargin at 20kr a ball (Thats around £1'50)

I want to make it from layers of knitting and crochet mixed, but with a twist turning the knit side ways and attaching the crochet made in all different sizes.

I have a rough sketch I will try and post so you can see what I mean.

The wine colours are beauitful very winter and Iam that confident if thier where a new film made for either that I have designed for I would send my final peice.

This will keep me busy for week so it should be this month I'll be mostly knitting
'LOTRRH' Sounds very Elvish!

So watch my space and I'll have fillers inbetween as you should know by now,Im a girl that has lots going at once.........

Or very bored I would become.

I recently purchased some knitting booklets from Iva Rose Vintage Reproductions. These patterns are absolutely fascinating - they have hats you can knit for your Air Raid Warden, mittens for bicycling????!!, and even Puritan Socks. Iva Rose doesn't just focus on knitting - you can even find such titles as "Scientific Hat Finishing and Renovating." All Iva Rose pattern books are 50% off until November 30, 2006.

Here's my favorite pattern find so far. Can you spot anything interesting about these gloves? Can those of you who've made Sanquhar gloves spot it?


Yes, these gloves from 1902 have individual triangular gussets between each finger. (You can kind of tell by looking at the lumps of knitted fabric between each finger - Sanquhar gloves also have these gussets in much finer fabric.)

I may make these for DH as I think he'll appreciate the extra movement the finger gussets give his hand. The instructions call for "medium-sized steel needles and Dexter cotton no. 10". The gloves start with 48 stitches so I'll probably do these in a sport or DK weight wool.


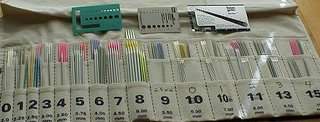
My dpns were overflowing my Circular Solution container so I moved some of them to the wider storage sections for needle sizes higher than 8. You can also see my three needle gauges - I have another one but I can't find it. I don't have any needle gauges smaller than size 0 US unfortunately.

Not all needle gauges are trustworthy so I generally measure needles twice in two different needle gauges. I've learned not to assume needles are a specific size when I buy them. I measure them when they arrive and occasionally I've found one needle that is a smaller or a larger size in the package especially in the really small sizes.


I don't usually use wood or bamboo dpns. I have a death grip on the needles and I wouldn't trust them in really small sizes anyway. From bottom to top on the photo:

1. Bernat Aero - by far my favorite dpn and circular needles. Yes the smaller dpns can bend and eventually the grayish coating wears off in places but they are lighter weight and a bit warmer in the hands than other metal dpns. They're only sold through Canadian sources and they're the most inexpensive dpns currently available. They come in sets of four in 6" and 8" lengths at Spin Blessing, Wool-Tyme, and Yarn Forward.

2.Balene - These are very old and I've already broken one unfortunately. I love the tips. Boye currently makes a Balene II version sold in larger sizes by Patternworks but I've never tried them.

3. Some bent Brittany Birches. I gave away all my other wood and bamboo needles to a 13 year old knitter in need of needles.

4. Knitpicks 6" dpns are similar to the Inox steel needles. They are apparently nickel-plated hollow brass. Their web site says they're made to be lighter but they seem heavier than Bernat Aeros. I bought all four sizes and will test them out in my next project.

5. Rhodo-Crystal Nacres are made from plastic coated steel in different colors for each size. They stopped selling them years ago but I'm glad I bought an entire set at Patternworks back then.

6. Pony Pearls are exactly the same as RCN needles except the tip is blunter. Perhaps it isn't so noticeable in the photo but it definitely is when you're trying to do a K2TOG. Patternworks sells Pony Pearls in two lengths - 5 3/4" and 7 3/4".

7. Bryspun have the same lovely tip as my old Balene needles and are made from plastic. I only have this one pair because they're a bit too flexible for my tastes. Patternworks also sells these.

8. Inox Steel - These are the only dpns I can find in sizes smaller than size 0 US (necessary if you're making the Sanquhar gloves). Lacis sells them in an 8" length and they are a bit heavy for my preferences. They're also quite sharp which is great for lace but I make sure I always put them away when not in use for safety reasons. Inox also sells coated gray dpns in the larger sizes.

How best to cast on--long tail method

click any illustration to enlarge


Hand knitting involves drawing new loops through old. So first, you have to HAVE some loops. Putting the first row of loops on your needle is called "cast on" or "casting on," abbreviated "CO."

There are several main kinds of casting on in this world including knitting on, and looping on (the subject of the next two posts). THIS post is about--

LONG TAIL CASTING ON
In many kinds of casting on, you first make a floppy sort of foundation row, often a row of simple loops which happily share yarn with their neighbors: growing or shrinking with the merest tug. To start your knitting, you must chase these skittering loops around the needle. It isn't until the third or fourth row that you get a rhythm going, and the foundation row often looks lumpy and distorted.

With long tail cast on, you don't have these problems because you make the foundation row AND knit the first row at the same time--that's why it's my favorite. In other words, long tail casting-on produces a uniform row of loops already pre-knit into the underlying foundation row. These loops and the foundation row stabilize one another.

Another advantage: for circular projects, other kinds of foundations are a bit skimpy; they're hard to hold right-side up so as to avoid making the dreaded moebius strip. In long tail cast on, you've actually created a looped foundation row AND a first row of knitting at the same time. Because more fabric lies on your needles, it's easier to keep the whole works sunny-side-up when you join for a circular project.

A note to the unconvinced: if you've tried long tail casting on and gotten a tight, unyielding edge, you're not alone. But it's such a great method, I urge you to try again.

In most knitting directions, the first stitch is shown as a slip knot. I think they're second-rate, and at the very end of this post I show a better way. But because most knitting instructions call for a slip knot, you might as well know how to make one.


SLIP KNOT
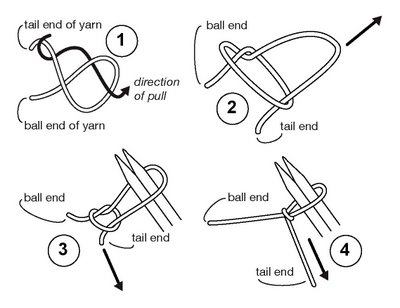
how to make a slip knot in 4 steps1) make a loop with the tail end of the yarn laying OVER the ball end of the yarn,
2) catch the tail end through the original loop and pull on the top of the new loop you just made.
3) insert two needles into the new loop, tugging the ball end,
4) snug the new loop around the two needles by further tugging on the tail end.

BTW: Here is a short cut to making a slip knot: Make a pretzel shape as shown below. Insert the needle as shown: over, under, over. Once the needle is through, hold onto both ends of the yarn and pull up with the needle. Then, tighten by pulling on the tail end. Voila: instant slip knot.


WHERE TO PUT THE SLIP KNOT
or: why is my tail always too short?

A lot of knitters DESPISE long tail casting on because the tail always winds up a few stitches too short. And there truly is no cure if your tail is too short the first time you try to cast on-- you'll just have to pull it out and do it again. But there IS a cure for moving the knot again and again, having the tail come out too short a couple of more times, and then suddenly, infuriatingly, having the tail coming out WAY too long.

showing placement of slip knot between tail end and ball end of yarnSee, with long tail casting on, you're making a looped foundation row at the bottom, and putting a first row of knitting on your needles, both at the same time. The top loops are a lot bigger than the bottom loops and take up a lot more yarn. So, what makes sense is to use the ball end of the yarn to create the bigger top loops, and the more limited tail end to make the smaller bottom loops. My casting on instructions are very specific about which is the ball end of the yarn, and which is the tail end.

If you consistently arrange the yarn this way, then at least when you move your first slip knot to a new spot and try again, you've got a far greater chance of getting it right. And, if you always arrange your yarn the same way, experience will shortly teach you how much to pull out in the first place.
CASTING ON IN 6 STEPS
First step: putting the yarn on your hand

Thread the yarn on your left hand as shown. The ball end (the end going to the ball of yarn) is to the left, trailing from your little finger, and the tail end trails from your thumb. The slip knot you just made is partway along the tail end.
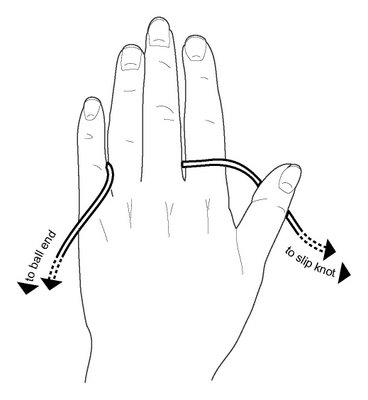
Preparation for casting on: Hand draped with yarn
The yarn passes twice through your fingers. You tension the yarn by pressing together the little finger and the ring finger, as well as the pointer finger and the middle finger.
* * *
Second Step: Preparation

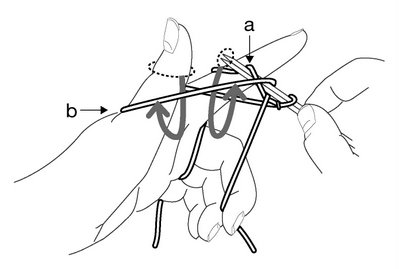
The strand marked "a" is the ball end of the yarn; "b,"the tail end of the yarn. Holding the needles with the slip knot in your right hand, arrange the yarn on your left hand as shown: the ball end remains between your ring and little fingers. Catch the tail end between your middle and fourth finger. Insert your thumb into part "b" --that is, the loop of yarn which stretches between the needles and your middle/fourth fingers. To get to the third step, swing your thumb towards you and up, as shown by the gray arrow.
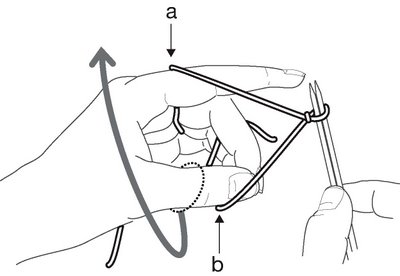
After arranging the yarn, this picture shows the first step in the casting-on process
* * *
Third Step

Once you've swung your thumb towards you and up as instructed in the second step, your hand should look like the picture below. To get to the fourth step, swing your right hand down, as shown by the arrow.

Your ring finger has a lot to do. The base of your ring finger is pressing against the base of your little finger to hold the ball end of the yarn in tension. The top of your ring finger is pressing against your middle finger to hold the tail end of the yarn in tension.
* * *
Fourth Step

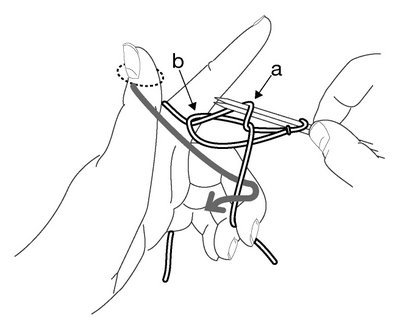
Once you've swung your right hand down, as instructed in the third step, your hand should be positioned as in the picture below. To get to the next step, follow the gray arrow: insert the tip of the needles through loop "b" on your thumb, and hook them around the front part of loop "a."
* * *
Fifth step

After hooking the front part of loop "a" with your needle as instructed in the fourth step, your set-up should look like the picture below. To get to the sixth (and last) step, swing the needles down and towards you, bringing loop "a" through loop "b." At the same time, swing your thumb down and out of loop "b."

* * *
Sixth step

After you've removed the needles and your thumb from loop "b," loop "b" is left wrapped around loop "a." In other words, what you've done is draw loop "a" through loop "b." Loop "a" is a stitch in the first row of knitting, and loop "b" is the foundation row through which that loop passes.

Long tail casting on is the same thing as making a foundation row of backwards loops and then knitting your first row into those loops. But making the foundation row and the first row at the same time is far easier than making the foundation row first, then trying to knit the first row into loops which skitter maddeningly around your needle.

If you follow the gray arrow and pass your thumb around the yarn below the newly cast-on stitch, you'll see that your hand is in the same position as step 3, above. From here out, repeat steps 3 through 7 over and over again until you have the correct number of stitches on your needles.

One last, but VERY IMPORTANT thing: When you complete the cycle of stitch creation and swing your thumb into loop "b" to make all look as it does in step 3, you are tightening up the bottom loop of the previous stitch. It is NOT necessary to yank that loop as tight as possible as you swing your thumb up. Rather, it is best to be mild in this adjustment. A tight and constrained long-tail cast on is directly traceable to an over-tightening of the bottom loop in this last step.

* * *

When you've cast on the correct number of stitches, remove one needle from the loops. There are all your stitches, ready to be knitted. They'll look loose, but after a few rows of knitting, you'll see that they magically adjust to the correct tension. (You COULD have cast on over one needle, very, very loosely, but it's hard to adjust your tension freehand like that.)

* * *
MISTAKES AND HOW TO AVOID THEM

Here are some notes to the wise, so you don't make the same stupid mistakes I do, over and over again.

1) Count your stitches. I often count the stitches as I cast on, only to find (five rows later) that I've got one stitch too many because I forgot to count the first stitch, which was made differently.
2) If you're making a pattern which requires you to count rows religiously, try to figure out whether pattern author cast on long-tail or some other way. Long tail casting on creates a first row as you cast on. Your first pattern repeat might have one too many rows if you don't count long-tail casting on as the first row. For further information about how to count rows in knitting, click here.
3) If you've pulled your second needle out, and then discover that you have too few stitches cast on, no worries. If you still have enough tail yarn left, simply hold the second needle next to the first and cast on some more stitches, then pull the second needle out of the newly added stitches: no need to unravel all the way to the beginning.

* * *
A LAST (opinionated) THOUGHT:
Getting rid of slip-knots

I've give the directions for the slip knot only because so many other knitting instructions call for it. But it's actually not a great technique for the first stitch of your hand-made project. No matter how you slice it, slip knot is a KNOT which is going to leave a hard nub in one corner of your knitting. That may not matter much in a heavy sweater, but in a lace shawl, it's a mess. In my opinion, the far better way to make the first stitch in knitting is by making a--

SIMPLE LOOP


The point of this blog is to infest your mind with all the little improving viruses which currently infest mine. So here's the best way, in my mind, to make the first stitch in your knitting. (FYI: this also works for the first stitch in crocheting.) If you make a simple loop, there's no knot. To start your knitting with a simple loop, just insert your needles and twist, and there's the first stitch, waiting on your needles. If the loop unwinds when you make the second stitch, that only means that you made the loop with the wrong end up. Twist it the other way and try again.


Final tangential thought: Although slip knots are not a great way to start your knitting, they have many other uses (such as making provisional stitches intended to be unraveled.) But, slip knot's highest and best use is tying balloons onto children and vice versa. If you practice this skill you'll be the hit of the next birthday party as the "balloon mommy."

--TECHknitter

ADDENDUM: If you have a truly monumental number of stitches to cast on, and want to do it using the long tail method, click HERE to be taken to a different TECHknitting post about a nifty little trick which assures that you CANNOT run out of yarn.

You have been reading TECHknitting on "long tail cast on."

some new/old fabrics & buttons

Just a quick post since I'm in the midst of preparing for tomorrow's dinner. So far the pumpkin & apple pies are made, the dough for the rolls is in the fridge, some turkey cutout cookies are waiting to be frosted (thanks to the cookie cutters from Mrs Staggs), and I am in the middle of constructing the squirrel favors from Martha, which Clarice showed us.

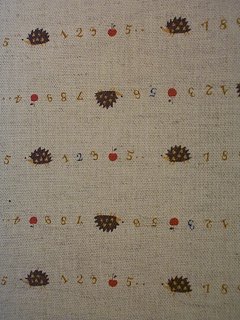
My superbuzzy order of hedghog fabric arrived, and I really love it. The quality of the fabric is great...

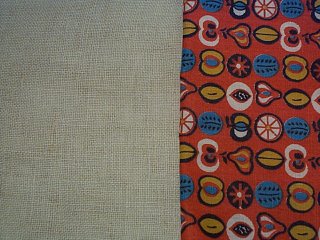
Below are two fabrics from the antique co-op last weekend; a natural linen on the left and a vintage print on the right...

These are the buttons I bought ~ there were so many more there that I would have liked...

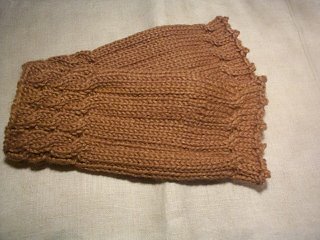
And you are probably tired of seeing these, but I did get the fingerless gloves for myself finished. I took a picture of one of them on, but sadly did not like seeing my hand...I will never get hired as a 'hand model'.


And now I'm off to make dinner, then frost some cookies, and finish those favors...

I wish you all a lovely Thanksgiving Day!