Ever have one of those days?


--Techknitter
R2D2 knits
R2D2 knitting
I knit a 12 foot long garter stitch scarf in a periwinkle shade of Twist from Knitpicks but it is too boring to photograph. It does match really well with a sage green jacket I have and I like really long scarves.

Here's the progress on the Selbustrikk gloves for DH in Knitpicks Palette (my new favorite yarn for colorwork gloves). I think most knitters save knitting the thumbs for last but I prefer to do them early to better fit the gloves as I go. And yes, it is STILL snowing here for the great blizzard of 2006.


Because we can't even get out of our driveway, all fancy-schmantzy New Year's plans are cancelled. Peaches recommends that everyone spend the holiday playing games with good friends.


She suggests a bunny nap to those who over-indulge in the New Year's festivities.


HAPPY NEW YEAR!!!
I'm a big snow person so I'm delighted that NM is getting socked this year. DH is stuck at home because the two highways into Albuquerque have been closed since yesterday and it is still snowing.


The middle photo is looking down on our little casita and the last photo is only about a third of our roller-coaster driveway. DH will likely insist on shoveling the entire thing and he's already been out to the post office and the little local store. I'm going to be totally lazy and knit instead.

The English knit stitch

The English knit stitch differs from the continental knit stitch in only one detail--which hand supplies the yarn. In continental style knitting, the LEFT hand supplies the yarn, in English style knitting, the RIGHT hand supplies the yarn. The yarn, however, goes the same way around the needles, and the needles go the same way through the loop.

If you are having trouble wrapping the yarn correctly in English-style knitting, look at the three yarn wrapping errors illustrated for continental knitting (ignore the fingers, just look at the way the yarn lays on the needles) link 1, link 2, link 3. Each of those yarn-wrapping errors is a wrapping error in English-style knitting also.

THE ENGLISH KNIT STITCH
click picture

Step 1: The right needle is inserted FROM the FRONT, TO the BACK of the stitch at the tip of the left needle, as shown. The right hand supplies the yarn--the right forefinger carrying the yarn acts as a shuttle, tracing a path in the air shown by the dotted line, above. The standing yarn (green) takes the path shown by the solid red arrow, wrapping around the RIGHT needle.

click picture

Step 2: Once the standing yarn (green) is wrapped around the right needle, the tip of the right needle draws the wrap "down and through" the stitch at the tip of the left needle as shown by the red arrow.

click picture

If everything goes right, this is what you will see on your right needle--a new stitch (green) with the right arm forward.

Other posts in this series:
The continental knit stitch
The continental purl stitch
The English purl stitch

--TECHknitter

(You have been reading TECHknitting on: The English knit stitch.)

Santa Fe Decorated for the Holidays

Knitting??? What's that??? I haven't accomplished much in the fiber department in the last week but I do have another tutorial to show you soon.

The plaza in Santa Fe


An art gallery on Canyon Road


More Canyon Road


A hotel all decked out

We went to Santa Fe again for Christmas eve and I managed to get some photos.

Here are some gentlemen lighting all the farolitos along Canyon Road. This is quite a laborious process and they were using canisters of butane? fuel to light all the candles.


A wreath on a coyote fence


Every year they do a large ice sculpture in the plaza of Santa and his reindeer.


Canyon Road again - not the best photo but in the front right you can kind of see a stack of pinon logs used for the bonfires/luminarias.


I'll have more photos tomorrow.

Merry Christmas

Warmest wishes to you all for a joyous Christmas and peaceful New Year!
I will be taking a blogging break to spend lots of time with Mike and the kids while they are home for the next week. See you in January!!

The continental purl stitch

The pictures say it all.
click picture

The yarn follows the path of the green arrow. Beware of the yarn-wrapping error illustrated in the inset--you'll wind up with a twisted stitch if you wrap the yarn "around the bottom" of the right needle, instead of "over the top," as you should.

click picture
If all goes right, here's what you'll see:


Merry Christmas--from
--Techknitter


HELP! A large brown rodent-like creature is eating all our Christmas presents!


HAPPY HOLIDAYS!

Knitting efficiently

Today, I’m going to rant on about *EFFICIENCY IN KNITTING.*

My heart leapt when I saw a book called “Speed Knitting.” But it wasn’t about efficiency, it was about big needles and big yarn.

Efficiency is really about ergonomics. How you hold the yarn and needles is less important than how much you MOVE the needle for each stitch. Of course, you may have to move your needles more because you are holding your yarn and needles badly, but the motion is really the first thing to analyze—all else follows.

The very fastest knitters move the needles hardly at all—production knitters in the old times often immobilized their (very long) needles by tucking the end of one or both needles into a knitting belt or sheath. Their fingers carried no weight, but were free to manipulate the very tippy ends of the needles with (evidently) incredible rapidity.

Today’s successors to production knitters are the awsome bloggers who produce scads of garments: a new lace shawl or six pairs of socks with every couple of posts. The rest of us do well to limp along producing as much in a month as these wonders produce in a week. Of course, actual production knitting is by no means dead, either...with all the baggage THAT carries. Check out this link to a truly scary sounding article--can anyone read Polish?

I have never had a chance to watch a true world beater. But the two fastest knitters I’ve ever seen personally (a Japanese lady who knits continental, and a British lady who knits English style) both share several traits: They move their hands very little. There are no grand sweeping motions, their elbows stay down, their wrists flex only slightly. The continental knitter's fingers do not move at all; the English-style knitter's fingers move only in a repetitive, efficient shuttling action. They do not sit hunched, they do not grip the needles with all ten fingers, holding on for dear life. The yarn flows onto their needles.

Because their motions are spare and efficient, their stitches always present at the same place on their needles. This means they’re not hunting for the next stitch—their hands know exactly where it is. Consequently, both of these ladies knit great swathes of fabric while hardly watching what they are doing.

How can us mere mortals duplicate this? Most of us probably won't. But we can walk a short way down that path. Get a drink of water. Sit in your favorite chair. Take a deep breath. Watch your hands, wrists, arms. Can you immobilize a needle by tucking it under your arm? By resting it on a chair arm or table? By tucking it into the cuff of your sweater? Can you stop your elbow from swinging out at every stitch? Can your wrist rotate less and still get the yarn onto the needle?

One reward will be faster knitting. An even better reward will be fewer repetitve strain injuries—the less you move, the less you strain.

--TECHknitter

christmas 'corners'

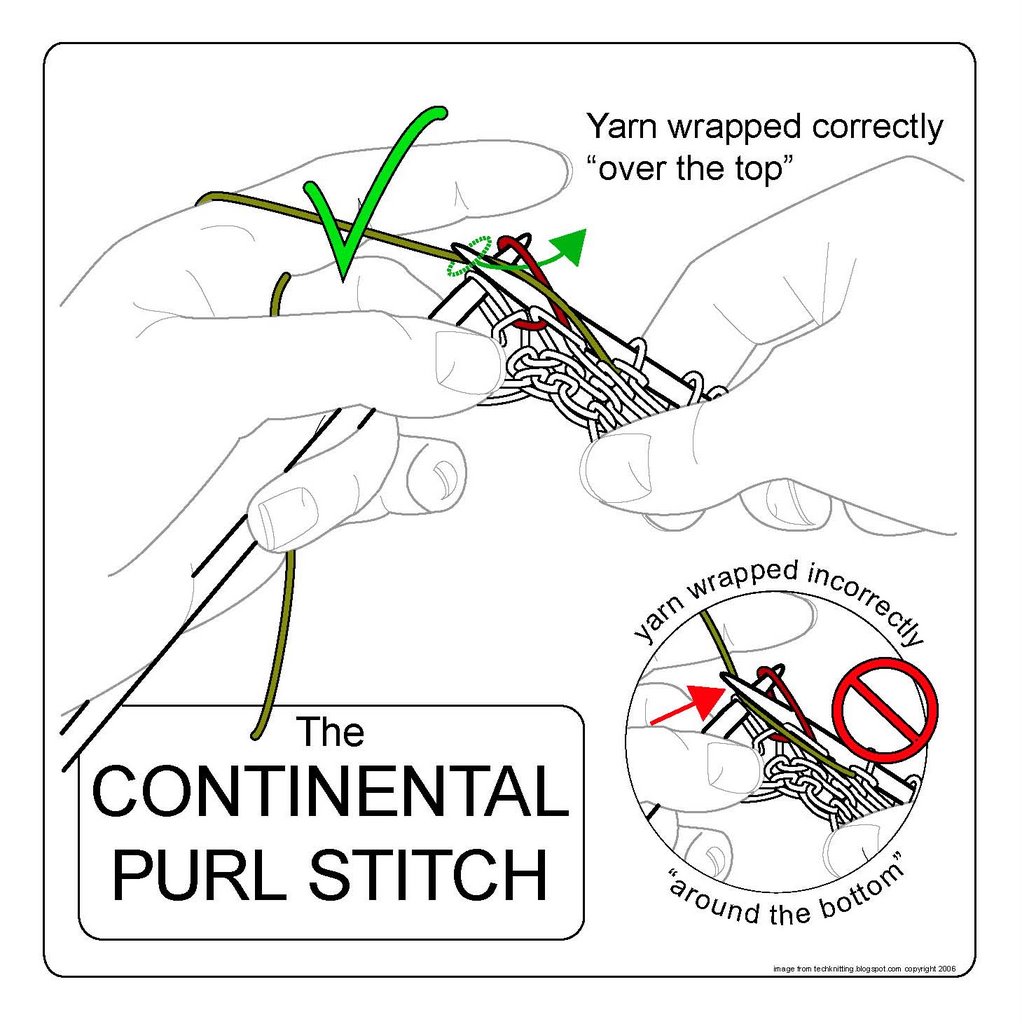
My Christmas decorating in the dining room is very simple ~ not sure if that's by choice or due to laziness, but probably a combination of both :)
Because of all the white in this room, I like to use some silver and sparkle here. The tea set was brought out and actually polished, as well as some garage sale finds like the candle holders, pedestal dish, and ice bucket. My mom made the beautiful and sparkly lighted Christmas tree, which is made of clear beads and safety pins with a strand of lights inside...
The green ball ornaments found a home in the pedestal dish and a creamy pointsettia was placed in the ice bucket...
Stephanie's collection of snowbabies are on the dresser and on the wall shelf. I hung a bunch of the glittery paper stars I made on the cabinets as well as in front of the french doors...
Some sparkly silvery garland is draped over the valance, and the soft trees sit on top of the corner cabinet...

The two decorated trees were already pictured here.
Over on the piano, a peek at some of my Santa collection...

I'm headed off now to do some cleaning, make some spaghetti sauce, and wrap gifts. The heating element for the oven is ordered, but won't arrive til 12/26 so there won't be much baking going on!

Have a great day!

The continental knit stitch

Today's post is about the continental knit stitch. It is the first in a four-part series, which includes the continental purl stitch, the English knit stitch and the English purl stitch.

HOW TO
There are many fabulous web sites devoted to teaching knitting. Several have videos, even. I don't have a lot to add to all that, but here's my little contribution towards illuminating the knit stitch, continental style:
click picture
continental knit stitch, step 1
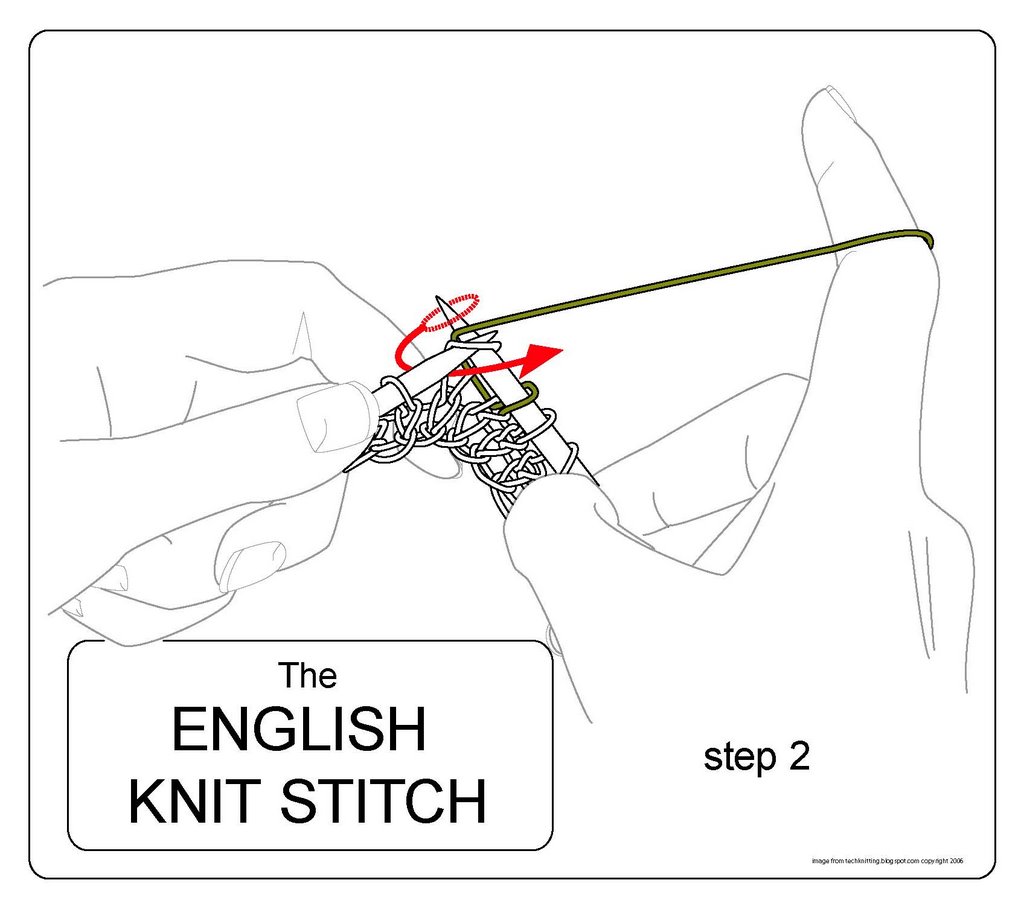
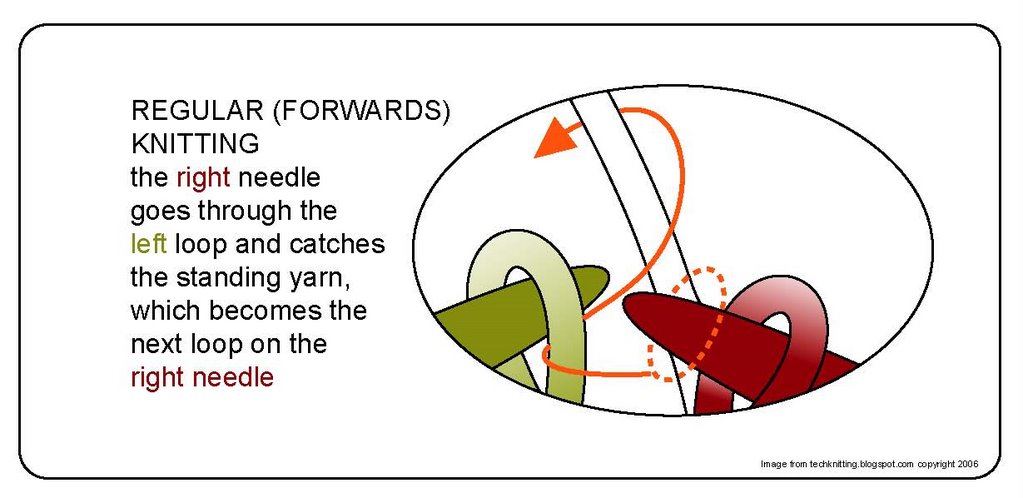
The right needle inserts into the stitch at the tip of the left needle, and catches the standing yarn (green) "up from under." The tip then travels out of the loop along the path of the red arrow carrying the snagged standing yarn, which enlarges and becomes a new loop on the right needle.

TROUBLESHOOTING
If you think about it, a lot of things have to happen "just right" for a stitch to be created and lie correctly on your needle--the stitch you're knitting into had to be made correctly, you have to position the standing yarn in the right place, the tip of the right needle has to be correctly inserted into the stitch and the right needle has to correctly snag the standing yarn. Something can go wrong with each of these steps, and generally does when you're first learning.

HOLDING THE STANDING YARN IN
FRONT OF THE LOOP
click picture
standing yarn in front of loop
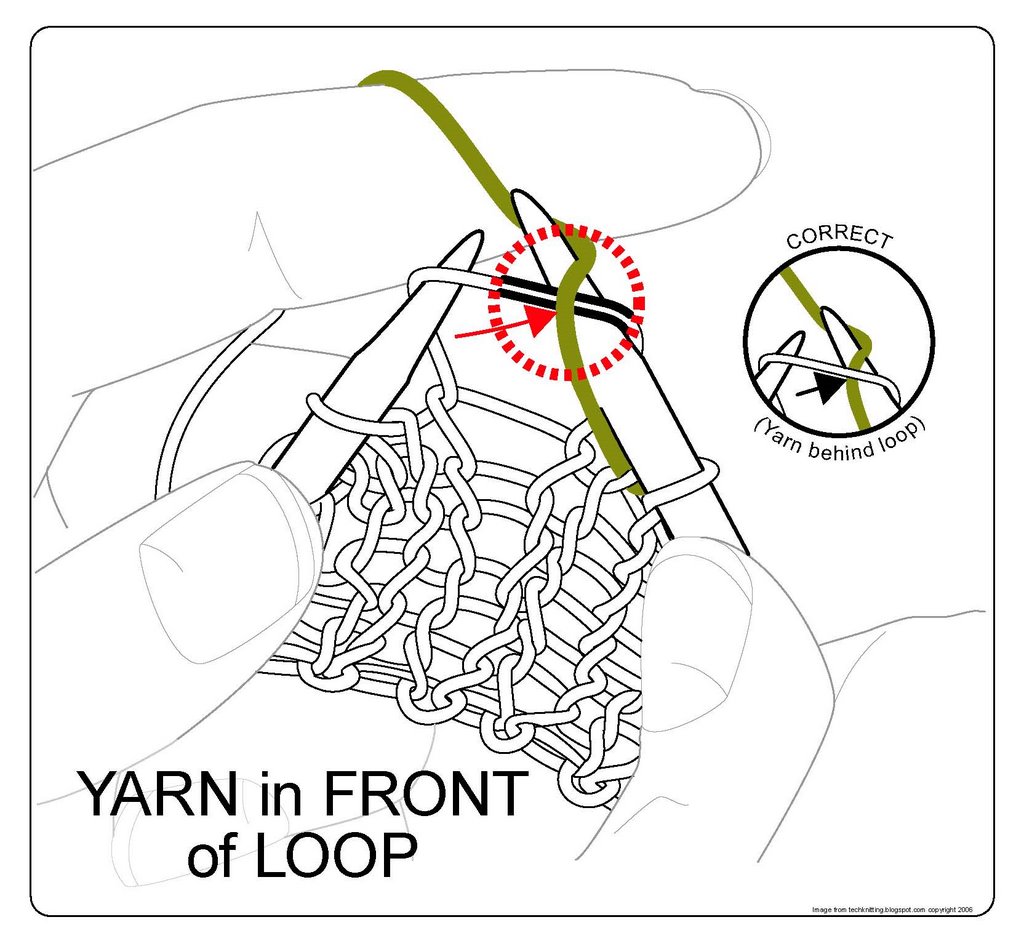
You won't get too far with this mistake--it's too hard to catch the standing yarn if you've held it in front of the left loop while trying to snag it from the back with your right needle. That doesn't mean you won't drive yourself nuts trying, though.

TWISTED STITCH
click picture
twisted stitch
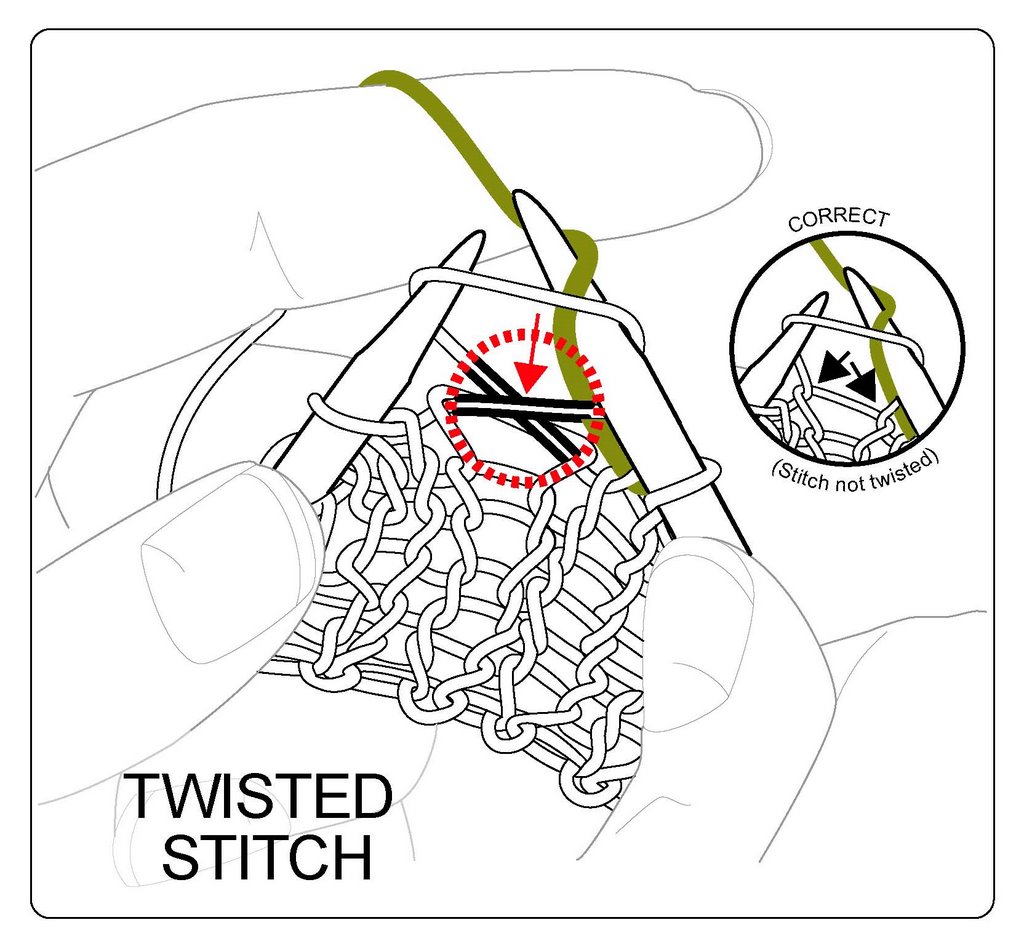
There are two ways to create this problem: Either the stitch was already sitting twisted on your left needle when you got there (because you inserted the tip of the right needle wrong when you made the stitch on the row below), OR you inserted the right needle wrong on this row (the correct way to insert the right needle into the left stitch is from the front, over the right arm in a left-to-right "hooking" motion .Either way you got there, though, if you see something happening like the illustration above, you've got a problem. Take it out and do it again.

CATCHING THE STANDING YARN THE WRONG WAY
click picture
standing yarn caught wrong
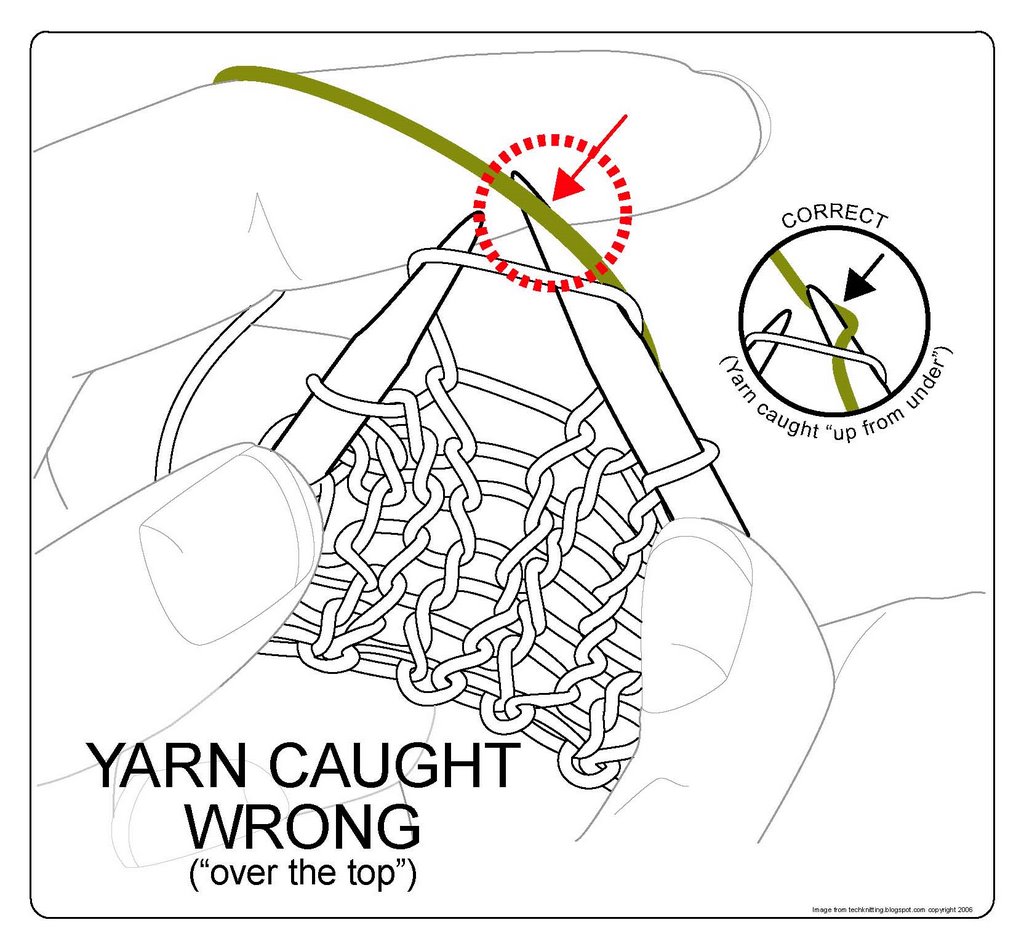
This, too, is a very popular error, especially when you first learn to knit, what with learning to control the needles, the yarn and your non-dominant hand (all at once). It's easy to make the mistake of catching the standing yarn "over the top" instead of the way it should be: "up from under." If you see this, take it out and do it again.

WHAT IT SHOULD LOOK LIKE
click picture
the final stage continental knit stitch
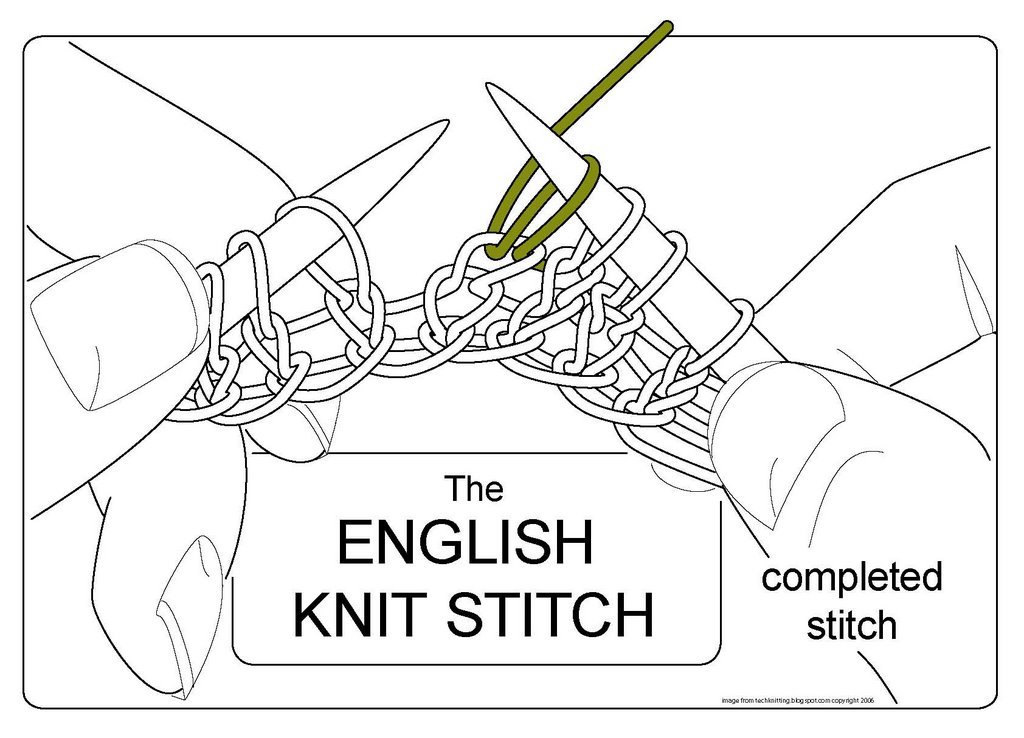
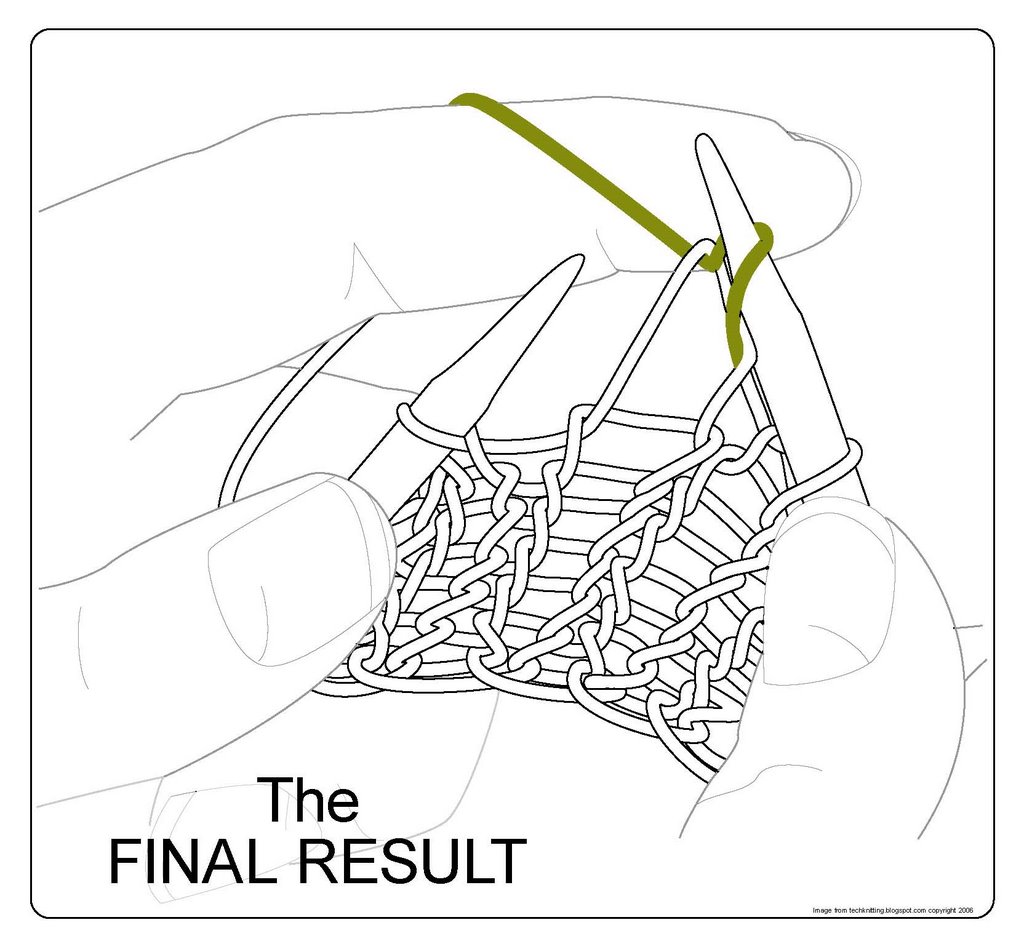
If you got everything just right, this is what the stitch should look like when you're done.

Next post: the continental purl stitch

--Techknitter

chocolate orange biscotti recipe & paper cones

The days here have been filled with crafting, sewing, knitting, wrapping, and until this afternoon, baking. That's when I walked past my oven, which was preheating for a batch of cookies, and noticed a bright yellow light inside. Not a good sign...when I opened the door there were flames. It seems the heating element has burned out at about the worst time of year possible. I guess it wasn't such a good idea to postpone my cookie baking!
I did get biscotti made a few days ago, and as Elisabeth asked, here's the recipe:
Orange Chocolate Chip Biscotti
1/3 c. butter, softened
2/3 c. sugar
1 tsp. baking powder
1/4 tsp. baking soda
2 eggs
2 1/4 c. flour
3/4 c. mini (or regular) chocolate chips
4 tsp. finely shredded orange peel
melted semi-sweet chocolate
Beat butter on medium speed for 30 seconds. Add sugar, baking powder, and baking soda; beat til combined. Add eggs; beat 1 minute at medium speed. Beat in flour. Stir in chocolate pieces and orange peel. Shape dough into (2) 8 inch logs. Place logs on a lightly greased cookie sheet ~ flatten slightly to 2 inch widths. Bake at 375 degrees F for 20 - 25 minutes or until toothpick comes out clean. Cool on pan for 1/2 hour. Transfer logs to a cutting board. Cut diagonally into 1/2 inch thick slices, and place cut side down on cookie sheet. Bake at 325 degrees F for 8 minutes ~ turn slices and bake 8 - 10 minutes more until crisp and light brown. Transfer biscotti to a wire rack and cool. Dip one end of each cookie in melted chocolate (or I often just use a knife to spread it over the cookie).
Makes about 32 cookies.
I hope you enjoy these as much as we do ~ the chocolate and orange combination is great!
These pictures show a couple paper cones I finished. I decided to fill them with boxwood, pine, crab apples, and tiny pine cones and have hung them in the kitchen and sunroom for decoration.
Hope you are all enjoying this week!

Sore Thumb


Today's thumb is almost the opposite of yesterday's. The sore thumb (also called the straight thumb, basic thumb gusset, side thumb shaping, and side seam thumb) sticks out directly from the side of the mitten or glove. Generally the people who hate peasant thumbs the most (like DH) love these thumbs the best. And vice versa. I personally find them somewhat uncomfortable because I feel like my thumb is being pulled away from my hand too much when my hand is at rest.


I often use this thumb for making gloves for men who usually have wider hands proportionately. There are several advantages to this type of thumb. I think it allows the most hand movement so it is ideal for use for gloves to be used for sports or other outdoor activities. This is a nice thumb to use if you're using a striped pattern because you can keep doing the stripes similarly on the gusset (or text as on the poetry mittens shown above). The best thing about sore thumbs is that the glove can be worn on either hand so you don't have to deal with making a right and left glove and using either side of the glove may mean the gloves last longer. (Except in the case of the Floral Fair Isle gloves below which have different patterns on each side.)


Unlike peasant thumbs, sore thumbs use a gusset. A thumb gusset (also called a sidewall, fourchette/forchette, and gore) is a triangular piece of knitted fabric starting at the base of the thumb that allows for better movement. In the sore thumb treatment the gusset is made directly on the side of the hand. I already talked about how I do the thumb increases on the side of a gusset HERE. In most patterns thumb gussets start immediately at the wrist and the stitches are increased every three rows for a good fit.

The handknits in the photos today are the Bosnian mittens from Blackberry Ridge, the Poetry Mittens (I gave the pattern away but I think it was from Threads?), and IK's Floral Fair Isle gloves.

Peasant Thumbs


There are four main types of thumbs used for knitted gloves and mittens. Each day this week I'm going to discuss one type of thumb. I don't believe there is one type of thumb that is best for every hand. I think the thumb that works best for you mainly depends on the angle from your wrist bone to your bottom thumb knuckle.

Today's thumb is the easiest thumb to knit. I call it the peasant thumb but it is also called the invisible thumb, set-in thumb, simple thumb and stocking thumb.


To do the peasant thumb you simply knit to the desired location, knit the thumb stitches on waste yarn, then transfer the stitches back to the left hand needle and knit over the waste yarn stitches. (You can also use the method I show HERE for the peasant thumb to make it easier to try on the glove or mitten for the best fit while you're knitting.)

To remove the waste yarn I first take a dpn and put the top stitches (row above the waste yarn) on the dpn by carefully picking up the right hand side of each stitch. Then I do the same thing with the bottom stitches and then I remove the waste yarn by cutting or pulling it through all the stitches.

Another method to achieve the same end result is called the set-in thumb by Sheila McGregor in Traditional Scandinavian Knitting. In this method, used for traditional Norbotten mittens, you don't put in the thumb at all. When you have finished knitting the tube you have the recipient try it on. Mark where the base of the thumb is (bottom thumb knuckle), carefully snip a thread in the center, take each side of the thread and rip out enough stitches until the thumb is wide enough, put the live stitches back on needles and begin knitting the thumb.

I have long, narrow hands and I like the fit of the peasant thumb very much. DH has wide hands with a wide angle from his wrist to the bottom thumb knuckle and he intensely dislikes the fit of peasant thumbs.

I’ve read that a peasant thumb affects the glove's durability because of the more limited ability to move the thumb. The peasant thumb is used often in traditional Latvian and Estonian designs and one advantage is that any color knitting pattern can be seamlessly extended up the thumb.

The knitted items shown above are Selbu mittens I made with graphs from Traditional Scandinavian Knitting and Liidia's gloves from Folk Knitting in Estonia.


tree tour

I hope you all had a good weekend. Mike & I did a little Christmas shopping, just some last minute odds and ends. I baked some chocolate orange biscotti, which I had to hide after our son ate five in one sitting! The chocolate dipped shortbreads I made are already gone, so in hopes of having some cookies left for Christmas, I think I will do the rest of the baking towards the end of the week. Last night we wrapped some gifts while watching Polar Express, which I had not seen before ~ I loved it!
And here's a few more of our decorations...
I have several little artificial trees scattered around, and I try to come up with something interesting to set them in. This is a small tree on the dining room table, which I decorated with dried roses, baby's breath, and tiny pearl garland. It fits perfectly in this rose transferware that I found at a garage sale over the summer.

This little tree with some tiny china Dicken's type figures sits in another garage sale find...
...on top of a flea market stand that I painted white.
In the living room, this tree, in a black painted urn, sits next to our nativity...


Lotrrh Finished

Finally finished, sorry I cant quite afford a model yet so unfortunately its me! And my daughter took the photos.
Hope you like it! Not sure what ill get worn for but you just never know when your going to have a Lord of the Rings or Robin Hood day!

Recycling and an Arm cuff


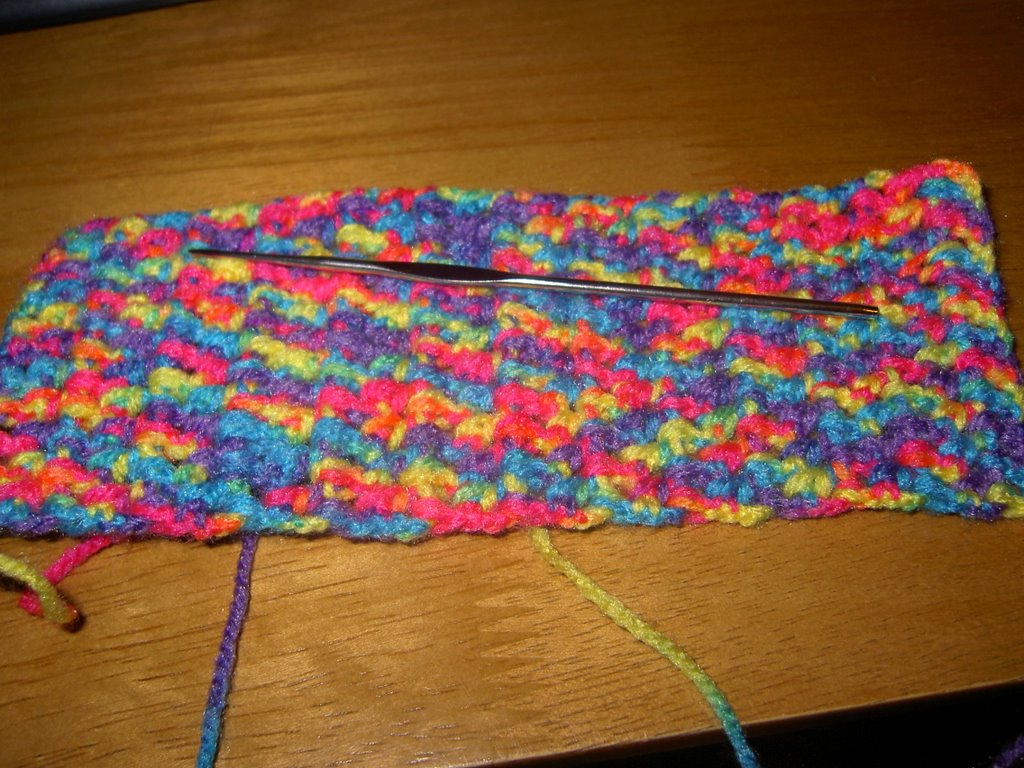
This is going to be an arm cuff. I have crocheted this using a hook that came in one off those high light your hair kits (Gems hair a while back now) that you pull the hair through the cap.

Worked just the same, but I guess the end is a little sharper as it has to hook through plastic.

I am going to attach both edge with ribbon like a shoe laced up, to make an arm cuff they seem very in with the teenagers.