Buttonhole alternatives

If you have trouble knitting good-looking buttonholes, two main choices face you: You can improve your buttonholes, or you can find an alternative.

Today, we'll look at these alternatives.

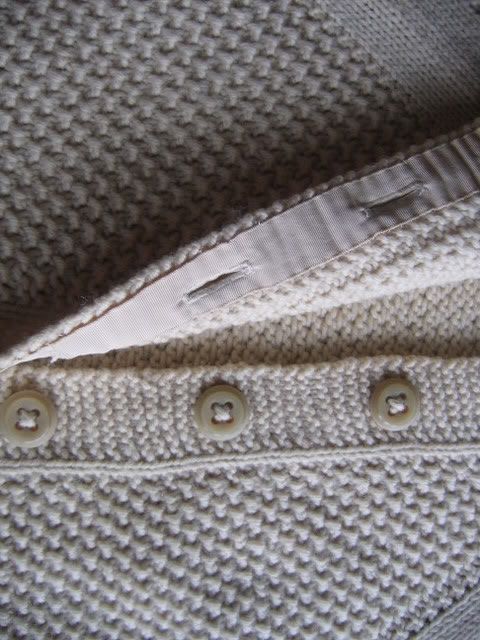
TAILORING SERVICE:
Although the neighborhood seamstress is an endangered species, machine-made buttonhole services are still available on-line and through many local yarn shops. A modern home sewing machine with buttonhole capability can work too, but try this out on a swatch before committing your precious sweater!

Upside: looks professional especially when paired with a grosgrain ribbon lining.
Downside: If sent out, it usually takes a while to get your sweaters returned , and this option can be expensive. Can be hair-raising to try this at home.

SNAPS. Many knitters want to try on the garment before deciding closure placement. One solution to accommodate this desire is snaps. After settling on placement, one half each snap is sewn into matching position on each front band. A decorative button can be sewn on over each top snap for a traditional look. Decoration buttons should not flop around, but should give the illusion they are buttoned through a button band, so use a button with holes (not a button with a shank!) and sew it on flat. Also, remember to sew decoration buttons onto the band which would ordinarily sport the buttonholes (men's: left; women’s: right) so that the sweater looks buttoned when snapped shut.

Upside: Looks good buttoned, allows you to defer closure placement until after the garment is finished and can be tried on
Downside: Doesn't look all that great when the garment is worn open: The half snap visible on the underneath button band may have that home-made look.

FROGS and CLASPS. Braid frogs (originally Oriental) and metal clasps (originally Scandinavian) are traditional non-button methods of holding garments shut. Both are widely available in many sizes and styles, both are sewn on at the end. These let you avoid buttonholes and can add a design element, also.


Upside: Like snaps, these allow you to defer placement decisions until after the garment is finished. These are easy to sew on. Both frogs and clasps add a decorative element. A plain sweater can be jazzed up to be quite unique by simply using these fasteners.
Downside: As the braid from which they are made stretches with wear, frogs begin to come open fairly easily. This requires sewing the loops smaller with secret tiny hidden sewing stitches. Although easy to sew on, it isn't always all that easy to sew an entire line of frogs on straight relative to one another.
As far as clasps go, these can be quite heavy, dragging down the front band of a sweater. Therefore, clasps work best when the sweater to which they are attached is knit firmly in a relatively heavy weight of yarn--DK and above, or when the clasp is small. Also, clasps can be expensive.

TOGGLES
: These are like frogs, but feature a straight or curved button which fits through the loop, rather an a knot of braid as frogs have.

Upside: Like frogs and clasps, toggles are sewn on afterward, which lets you experiment with closure-placement after the garment is finished (i.e.: when you can try it on). Toggles have the potential to be an interesting design element.
Downside: Like frogs, you have to keep a close eye on your sewing to get all the toggles sewn on straight relative to one another on both bands. but more important, when the garment is worn open, the toggle swings loose, (annoying!) and may catch in things, especially the pointy horn-shaped toggles. Any kind of toggle is not so good for babies who may get the toggle in their mouths: a potential choking hazard.

SHAWL PINS. Originally used to keep elegant scarves and shawls together, these are increasingly used for sweaters, especially the swing-type held shut only at top. Great versatility is possible: in the evening, a bold jewelry-like pin can dress up the sweater which spent the day at the office looking demure under a plainer, smaller pin.

Upside: Beautiful, easy to use. Easy to change the look.
Downside: Works best on a sweater which can be worn with one (and only one) closure point--such as the top of a swing jacket, of the waist of a fitted sweater or jacket. On two-piece shawl pins--where the stick-like tang pokes through a shell (casing), but is otherwise not attached--the tang can fall out.


Good knitting! --TK

PS: You can still participate in the POLL with a chance at a PRIZE through May 15, 2010!

My crochet has gone all Lady Gaga


Back from the UK and my start at Marie Antoinette
has unfortunately gone all Lady Gaga.

It started off very Basque like, very Antoinette
(not in colour choice , but style)
My 80's colour choice
was inspired by the sound track to the film.

LADY GAGA

This much happened on my very bouncy plane trip home.

I arrived back to Stockholm 8pm after taking a car, bus, plane train then tube followed by tram if only I had not been to tired to take a boat trip then I really would have indeed got in all modes of transport in one day.

Feeling a little Gaga...... yes I was.;-(

http://en.wikipedia.org/wiki/Lady_Gaga


All crochet and all in one piece.
It reminds me of one of those 80's Lycra swimming costumes.


What I am supposed to be making...........stitch up close below.

I'm crocheting in both directions. And really if I complete this as a Gaga not much more fabric/yarn will be needed.

Trying to find a picture of her clothed quiet a difficulty.


Never enough MARMITE


Marmite in my house is gold dust. You can buy this form the English shop in Stockholm if you want to be completely ripped off. Or you can rely on friends and family, but we have been here a while and now most seem to forget.

Forget my family's addiction to the brown stuff and I'm not one to ask.


Another issue of Marmite the regular shop brought is in glass jar so a big issue to popping in your suit case, imagine that all over you clothes.........

Gemma to the rescue.......

Gem told me of a place that sold it in a massive plastic pot.........
Urban myth........proof is in the picture.

Now we are ok until it's time to leave;-)


£1 shop ducks


All these for a £1, a bargain that could not be missed, funny thing was that they would not fit in my suit case. So they went as hand luggage along with my new bed linen and sheet in the same bag as my lady gaga crochet, the security check must have smiled when he saw that little lot come through on his monitor.

a dish towel makeover

 I wanted to make a little gift for someone, and I needed it the same day so I decided to fancy up a couple plain white cotton dish towels, which I had on hand, with a printed fabric border.
Just in case you are interested, here's what I did:

My dish towel measured 17.5"w x 36"l.  For the border I cut a piece of printed cotton that measured 19.5" x 6" ~ {this piece needs to be about 2 inches longer than the width of your towel}  This leaves an extra inch on each side, which gets folded in so the border is the same length as the end of the towel
I placed the border fabric {with the ends folded in} right-side down on the back of the towel and pinned the long edge together.

I sewed along that edge with a 1/2" seam allowance.

I opened out the border, turning the towel to the right side, and pressed the seam allowance toward the border.
Then I pressed the raw edge of the border under by 1/2".

I folded 2.5 inches of the border strip up {wrong sides together} to the right-side edge of the towel... 

...and stitched along close to the edge of the border as well as the two ends of the border strip.

When finished, the border will completely enclose the end of the towel and will look the same on both sides.

A great way to use up some odds and ends of fabric...you could even make the border a patchwork of different prints.
Happy Sewing.

Fixing Up the Blog

I've been hoping to add a feature to this blog that would show similar posts to each blog entry. I found LinkWithin and installing it was easy as pie. However, that set off a storm of other work. First I had to change my blog template to widen it. I did that and then realized that some of the posts LinkWithin links to had no title. (I only added the ability to add titles to blog entries about 1 1/2 years ago.) So I'm laboriously going through blog posts since January 2003 to add titles. I also have to make a new blog header. Please bear with me while I figure all this out.

Here's the vista from this morning; we had a slight dusting of snow last night and you can still see it on the Sandia Mountains.


New information on buttonholes

Addendum, June 1, 2010: There is now a VIDEO about the new Tulips buttonhole--click here!

In the upcoming release of Interweave Knits, summer 2010, among the wonderful new designs and terrific articles, there is an article about buttonholes by TECHknitter (that's me!). Some older buttonholes will be reviewed and updated. Also, there will be some information about how to properly sew on a button and about buttonhole placement. But the most exciting thing (for me, anyway!) is that a new buttonhole technique will be revealed which I've been working on for years and years.


Truthfully, after finally figuring out all the parts, it was not clear to me how it could be explained or illustrated, and I was ready to give up on ever bringing it to public attention. However, Eunny Jang, the editor of Interweave Knits, insisted on having a buttonhole article, and would not take "no" for an answer. Under her pressure, I kept plugging away at different methods of explaining it, and finally hit upon one. So, thanks to Eunny and her stubborn insistence, this new buttonhole is waiting to meet you all in the summer 2010 Interweave Knits.


One year after this article comes out in Interweave Knits, the copyright reverts to TECHknitting blog, so watch this space in about a year for the complete illustrated details on-line. In the meanwhile, check out the print version, at your local bookstore or supermarket, or in your public library.

I hope you will like this new article and will try the new buttonhole.

Good knitting --TK

PS: Don't forget, the Poll with a chance at a Prize is still running. Get your comments in by May 15 to qualify for a drawing of a prize--$20 gift certificate at the yarn shop of our choice.

blueberry rhubarb crumble

If you are looking for a way to use rhubarb, here is a recipe for rhubarb crumble.
I'm not sure where I found it, but it is a good one!


Cut 1/2 cup of butter {cut into small pieces} into~
1 1/2 cups rolled oats
2/3 cup brown sugar
1/2 cup flour

I like to use my food processor ~ just pulse until it looks crumbly...
Reserve 2/3 cup of this crumb mixture and pat the rest into the bottom of a greased 9 inch round pan.
Bake at 350 degrees F for 10 to 15 minutes.
In a bowl, combine:
 5 cups of fruit ~I used about 3 cups of rhubarb cut into 1 inch pieces and about 2 cups of frozen blueberries~
1/2 cup sugar
2 tablespoons flour
Spoon the fruit mixture onto your baked crust,
then sprinkle the remaining crumb mixture on top.
Bake at 350 degrees F for 45 to 50 minutes.

Best served warm with a scoop of vanilla ice cream...

Crochet Packaging Dress Finished!


These are the final picture's, it's still in the making.

It's actually the completing, completion.

The finishing touches, if you like. And yes I am very happy that it's completed.

I started this in Oct, I have worked on lots of projects along the way but
I think that this is defiantly one of my longest projects.

6 months of hard work.

http://cuteknitting.blogspot.com/2009/10/crochet-and-vegetable-packaging.html


This was the stitch for the edging.

It's a strong stitch so I used it to enhance and enforce the neck line.


Also to re-enforce the side seam.


I added yet another rectangle panel to the front of the dress.

Just to add layers.

I felt that it needed a little bit more attention at the front as the back is so detailed.


The sleeves, Oj Oj Oj where a big issue.

I had to add the sleeves last and they really just hung.

I was not sure one I had the bright idea to attach them in whole pieces.

I tried to-do the edging with different fancy stitches,didn't work then turn ups.

With no success...........but then a little light bulb pinged inside my head.

I used a piece of paper so I had a straight edge and then using sharp scissors, I cut across at an angel.

Thus creating a pointed sleeve.


Sleeve cut.

Below I just stitched three layers using a 2'5 hook. Basically a tidy little edge that showed of the angel of the sleeve.

Nothing more nothing less, the turquoises blue is really set off by the red.


I have not really explained this in my
YouTube title, but this is part one. It's actaully the making of the dress.

In 6 months of work, I have accumulated a lot of photo documentation so I figured it was well worth the double YouTube.


The making to follow, I figure why rush it now;-)


Nothing But Links


In September Alice Starmore's Aran Knitting book will be reprinted; it has a new cover and the blurb says it is expanded. I think I'll wait to hear about the expanded part to determine if I should buy another copy. The photo above is a close-up from my St. Enda sweater from the book; the finished sweater turned out large enough for DH and I to fit into it at the same time!

GLOVES

I wanted to link to the work of a wonderful glove designer, Asa Tricosa. I am especially in love with her Io Gloves.

COLORWORK

HERE is a free pattern for a pretty Latvian hat pattern that uses Satakieli yarn.

Check out Cynthia Wasner's (cwoz on Ravelry) Norsk Needlework site. I am especially in love with her Quaker Sampler sweater with matching mittens.

I don't recall how I even found EvaL8 on Flickr but check out the embroidered felted mittens at the bottom of the page. If you scroll through her photos you'll also find some wonderful stranded shawls.

I greatly enjoy Johanne Landin's Born to Knit blog. She designs colorwork accessories patterns and lives in Sweden. The blog is in English and contains beautiful photos.

HERE is Jorid Linvik's pattern shop - she does a lot of wonderful stranded designs featuring animals. I love her cat socks.

Jessica Tromp is offering a beautiful stranded cardigan pattern for free; the Noors Vest uses DK weight yarn.

I'm considering making these spectacular Nordic Kathrine socks by Ellen Haugland the next time I'm in the mood to knit socks.

This free pattern for the La Gran Fair Isle pillow is a good stash buster and it only uses 2 colors per row.


PATTERNS FOR CHARITY

P/HOP stands for Pennies for Hours of Pleasure and is a knitting fundraiser for Doctors without Borders. They have a few pretty stranded sock patterns and you decide how much you want to donate when you download the pattern.

Never Not Knitting Window Display At Loops!


This is so cool I just had to share it with you!

A few weeks back Shelley, the owner of Loops yarn shop in Tulsa Oklahoma, asked my permission to use my Haltermelon and Cedar Leaf Shawlette pattern pictures for a front window display for her shop.
Of course I said YES!

Above are the pictures she sent me of her new window displays.

You can't tell from the pictures but these photo banners are 4 feet across by 6 feet tall!
How awesome! I so wish that I could see the displays in real life!

I cant tell you how amazing it feels to have a yarn shop prominently feature my designs like this.
It truly is an honor! Thank you Shelley!

If you live close by, please check out Loops! You can find more info about the shop by clicking here. Loops stocks all of the
Never Not Knitting designs in print if you'd like to see my patterns in person.


joys of Spring


Spring flowers and new baby chicks are two of my favorite joys of Spring.  I can't pass up the dollar pots of tulips, which I will let bloom inside then later plant outdoors to enjoy year after year.  I also picked up  a couple pots of pansies for the urns on the front porch, which will tide us over until after the frosts/end of May planting time.
The baby chicks arrived last week via the post office, where we picked them up at about 7 AM,  the box fairly bursting with the sound of all 26 peeping at once.  There are Cornish X Rocks to eventually fill the freezer and Araucanas and White Rocks for egg laying--everyone is doing well out in the barn, warm and cozy under their heat lamp. 
In the garden, I've been pulling some leeks for potato & leek soup--my favorite, and I planted two rows of red potatoes and a row of fingerlings.  I also planted two raspberry bushes and a rose bush.  It's impossible to stay indoors when the weather is nice, hence the lack of 'spring cleaning' posts.
Most importantly, thank you all so much for your comments on the shawl collar sweater!!

No Flying Home Today!


A nice morning in Stockholm, with a clear gray sky?

No sight of any planes, unfortunately for 1000's

It was my turn today, to be mad. Volcano's.......


HOME SWEET HOME

Or not in my case.........(l,m,o,l)
Rubbish at text speak last moan out loud


Fixed my O
, completed my re-do

Agian I'm going home.

Today actually I was supposed to return to the UK with my daughter, to visit Gemma.

She is due a baby and I wanted to see her before it's born/pregnant, another dear friend of mine had twins and I never got to see her and it really upset me, after when it was to late todo anything!.

It hit me,
that I missed something so major, a photo just does not cut the mustard.


Home

But not just this home visit, actaully going home for good.

By July 4th we leave.......again I type loosely as this was supposed to happen a year ago. So when the trucks pack I will no its for real.

But anyway enough time spent on that, it's sad and strange I am a wonderer but four years is home, but Sweden isn't home. Only the traveller among us would understand, leaving your home country is a strange thing to do.(my opinion)

Not learning the language as it was short term even stupider;-(

Even stranger, the international mix of the Expatriate life, what you should, shouldn't do.......with who and whom.
(Big can of worms, I think that Ill save for a book some day not a lot to-do with knitting and Art)

Stockholm

The artist I have become, a reader(Always magazine B4 Stockholm)
Tonne's (kelton-ism) of new and wonderful experiences, new fiends, new contacts.

A few beep ones along the way, life can not all be a bed of roses. Mind you it would be nice to sleep in a bed of rose petals,the smell the feeling, but at some point a run away thorn would get you.

In today's case a volcano, I'm moaning again!.

Enough said

Here is some of the latest re-do art, as I have been on a bit of a mission sorting the mass amount of art that I have accumulated,

(Spring clean, re-reading sketch, re-do unfinished and basically changing things)


This a big task, but fun realising how much my style has changed and become.


Something quiet sexy about a man who can sow........

Or maybe that's just me!, I thought that I would post this photo, not to annoy my other half but that I am pretty proud that I taught him to sow. A video would be better as the picture as they say does not have a 1000 words and if it did most would be swears as he pricked his finger more times than stitches that where sowed. But as they say practice makes perfect.


My Knitted Rock graffiti is still in place.


It really looks like part of the scenery.

It has totally blended in with its surroundings, the perfect place.


Working in ends as you go along: same color or changing color

In this post are links to ten different methods (all illustrated) for working in ends, 8 of which are as-you-go.

1. The Russian join--this join is well-known as a simple method of joining two colors, but it works for same-color joins just as well. An example of where you might want to work in two different colored ends is with stripes or with fair-isle methods. An example of same-color joining is here you run out of yarn and need to switch in a new ball of the same color. This join, like most the others on this page, not only secure the transition stitches, but also works the ends in as-you-go.

2. The back join is an improved Russian join--with the back join, it is possible to exactly choose the spot where the yarns will change, which is not the case with the Russian join. Another improvement is that the back join is WAY faster than the Russian join--no need to dig out a sewing needle! Like the Russian join, the back join is usually touted for changing smoothly from one color to another, but it is also a nifty trick for same-color joins. Also like the Russian join, if you use the back join, there will be no ends to work in at the end--all you have to do is snip off the excess after blocking and you are done!

3. For same-color joins, there is also the overlap method. (scroll at link) This method is probably the very fastest of all. The overlap method will not work (or at least, will not work very well) for changing color, but for same-color joins, there is nothing simpler. With this method, and depending on the yarn used, it may be necessary to leave little tags (tails) on the inside where the yarn changed, but because the stitches are overlapped, these tags will never work free--the transition stitches will remain tight and good looking for the life of the garment. This method can be adapted for lace, also, without the tags.

4. Not to be confused with the overLAP method (above) we also have the overCAST method. For delicate work, or for thin yarn, this trick lets you work in the ends with no added bulk on the face of the fabric. Therefore, this method is to be preferred to the Russian- or the back-join when bulk is an issue: both of Russian- and the back-join add a bit of bulk to the fabric surface, which this overcast method does not. Like the Russian- and the back-join, with the overcast method, the ends are worked in as-you-go. You need only trim off the excess after blocking, and your fabric-finishing is complete.

5. Another great (if slightly icky) method for dealing with ends is the spit-splice, also called "felting ends" (scroll at link). This works best for same-color joins--for different color joins, you would have a length of yarn which had both colors at the same time. Felting ends is not so much a method for working-in ends--instead, felting actually
eliminates the ends!

6. We also have two methods of working in ends using a sewing needle--an after-the-fact fix for loose ends. The first of these is the art of weaving in ends. With weaving, the end is worked into the fabric face along the same path as the underlying stitches--it is a species of duplicate stitch. A sub-set of weaving is how to weave ends in ribbing. Weaving is quite, quite secure, but it can add a little bulk on the fabric face, so if this is a concern, consider using the method below, instead.

7. The second method of working in ends with a sewing needle is the skimming-in method. This method is not quite as secure as the weaving-in method, but it avoids bulk on the fabric face, and so is better than the weaving-in method for thin yarns or delicate work. Both the weaving-in and the skimming-in method work with different color yarns OR same color.

8. A sub-set of the skimming-in method occurs when you are facing a very short tail--so short that you can't really thread the needle. For this problem, we knitters can adapt a classic dressmaker's tip for working in the too-short ends.

9. Another place where ends might be an issue is at the beginning of a circular knit. That tail hanging where the join occurs can work itself loose and get ugly. A trick for preventing this AND working the tail in at the join is the three-in-one TECHjoin. Further, the three-in-one TECHjoin also prevents the nasty "jog" where the first round meets the cast on.

10. We end with a quite-specialized trick for working in your ends on textured stripes. This trick shows how to make jogless stripes in textured fabric AND work in your ends-as-you-go. It's a nice time saver for those who like to make stripy ribbed hats.


Good knitting! --TK

Cosette In Malabrigo


I just wanted to share with you this lovely version of my Cosette Wrap knit out of Malabrigo Worsted.
This was made up by my lovely friend Claire to be included in the Never Not Knitting trunk show.

What a wonderfully cozy sample this is. Malabrigo Worsted is such a soft wool and reasonably priced as well!
The body of the wrap is knit in the Paris Night colorway and the edging is in Polar Moon.

If your local yarn shop is on my trunk show schedule, you'll get to try on this cozy wrap for yourself!