 |
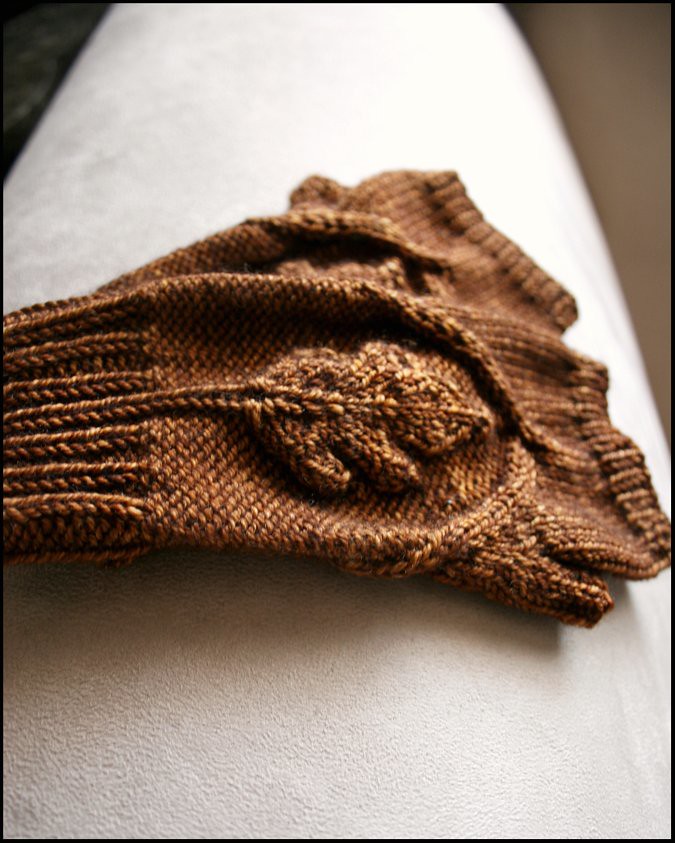
| Illustrations by Jill Zielinski Designs. I have a new pattern coming out soon! It's a pair of fingerless mitts called Oak Grove and I am very excited about them! I will be posting all of the pattern information within the week. For now.. here is a sneak peek! |
Coming up next!
"Zan-Gah and the Beautiful Country" Review
 "Zan-Gah and the Beautiful Country"
by Allan Richard Shickman
Publisher: Earthshaker Books
Release Date: Sep 265, 2009
Source: sent by publisher
My Rating: 4.5 out of 5 stars
Summary from goodreads.com:
The prehistoric saga continues in Zan-Gah and the Beautiful Country, the sequel to the award winning Zan-Gah: A Prehistoric Adventure. In this story, Zan s troubled twin brother, Dael, having suffered greatly during his earlier captivity, receives a ruinous new shock when his wife suddenly dies. Disturbed and traumatized, all of his manic energies explode into acts of hostility and bloodshed. His obsession is the destruction of the wasp men, his first captors, who dwell in the Beautiful Country. When he, Zan-Gah, and a band of adventurers trek to their bountiful home, they find that all of the wasp people have died in war or of disease. The Beautiful Country is empty for the taking, and Zan s people, the Ba-Coro, decide to migrate and resettle there. But the Noi, Dael s cruelest enemies and former tormentors, make the same migration from their desert home, and the possibility develops of contention and war over this rich and lovely new land.
My review:
In the sequel to "Zan-Gah", Zan and his tribe move to a more fertile land called The Beautiful Country. While we don't see quite as much of Zan in this book, we do get to meet fascinating new characters in his world.
Dael, Zan's twin brother, descends into darkness again after his wife's death, which causes even more problems for Zan and his tribe.
We meet Zan's wife, Pax, who is a match for him in all ways. She's a fantastic hunter, very rare for women in their tribe. Zan's twin, Dael, looks down on Pax's skills as a hunter but Zan admires her and sees her as an equal. I love Pax's character, she's such a strong girl, but vulnerable in her love for Zan.
I also love the character Rydl, the boy from the opposing tribe that Zan took under his win in the first book. Rydl marches to the beat of his own drummer and because he's small, he uses his wits to win battles instead of brawn. Rydl's relationship with Sparrow is very well-drawn and heartbreakingly honest.
Main Characters: 5/5
Supporting Characters: 5/5
Setting: 4/5
Romance: 4/5
Uniqueness: 5/5
Cover: 3/5
Writing: 4/5
Bottom Line: I enjoyed this book just as much as the first in the series, because I got to see how interesting the other people in Zan's life are. I hope to see another installment of Zan's story, he's a great hero with a great story to tell.
Curling scarf rescue mission--part four: lining the scarf
This TECHknitting series on curing curling stockinette scarves has looked at the problem, at solutions which don't work, and at two solutions which do work: drop-columns and transforming stockinette into ribbing.
Today's poster child for curling is a multi-blue scarf. Although you can't tell in its wound-up state, this scarf has two tapered ends and an applied edging. Drop columns or forming ribbing would mean taking off, then reapplying the edging and unraveling, plus re-knitting one whole end--a LOT of work. Further, with no excess yarn in stash, re-knitting and re-edging is a doubtful proposition: every inch of un-picked and unraveled yarn would have to be in perfect shape after unkinking for this scarf to come back together. Very risky!
Of course, this isn't the only sort of scarf which cannot be fabric-reworked. Below are two other scarves-- a cheerful, beautifully-designed flower intarsia scarf and a lace scarf--which would be ruined by drop columns or ribbing. Luckily, however, all of these scarves have had their curl straightened by this post's solution: lining.
Unlike the little stitches illustrated in the post on overcast stitches, the stitches on the multi-blue scarf are rather large: one sewing stitch per each knitting stitch of the edging. The thread was used doubled, and the needle was inserted between the yarn plies of the innermost line of edging stitches. It would be possible to simply insert the thread under one arm of the knitting stitch, as well--whether to take the sewing needle through the plies of each knit stitch or under one whole strand of each knit stitch is a matter of personal preference.
The colorful and cheerful intarsia scarf shown below was knit by Sandra Woods, (Passionateknittr on Ravelry) and the photos are used by her permission. (Many thanks, Sandra!)
The before and after shows that lining was really the only option here.
Further, the lining on an intarsia scarf does more than simply cure the roll. First, the floats on the back are hidden. Second, the many ends can be securely fastened without having to make the back pretty. Finally, the bright red color of the polar fleece lining adds a strong design element. A completely different effect would have been obtained, for example, by using a different color. This opens design possibilities. Matching scarves could be made for two sisters, say, of different temperament and personality. Each scarf could be identical in the knitted work but quite different in finished effect via different colored linings.
The cotton lace scarf to the left was lined with silk. Unlike polar fleece, silk is a woven fabric which must be hemmed after cutting and before being stitching in place on the scarf-back. I hemmed the silk by hand, folding the edge under twice and backstitching the hem in place. The hemmed silk lining was then overcast-stitched in place on the back of the cotton scarf, with the hem line on the inside, hidden forever against the purl face of the scarf being lined. As you can see, this scarf was lined in a contrasting color--orange china silk on a fuchsia scarf. (Polyester lining or poly-silks work, too!) Thus, the lining not only cured the stubborn curl, but added an strong design element. Other views of this scarf can be seen here. Addendum, 1-17-2011: Lisascenic on Ravelry has kindly allowed me to link to her silk lined scarf, on which the lining was sewed differently--sewed over the edge of the knitting, which gives a very interesting look, too, almost like a knit-lined silk scarf!
Of course, linings are not restricted to hand-knit masterpieces such as intarsia or lace: they work very well in utility situations also. On the last post, Fibercrafter-Sally left a comment about using a knitting machine to make simple stockinette scarves for charity. Stockinette rectangles could be made on a knitting machine, then cured of their curl by being lined with polar fleece. If the polar fleece lining were stretch-stitched on by sewing machine, these kind of machine-knitted scarves could be churned out by the dozen. Some nice effects could obtained by the contrast between the yarn and the linings (and think of the matching lined flip-brim hats which could be made...)
With best regards for a happy and healthy new year--TK
Curling scarf rescue mission, part 1: the problem and the solutions which don't work
Curling scarf rescue mission, part 2: the drop-column method
Curling scarf rescue mission, part 3: transforming stockinette into ribbing
 |
| poster child for stockinette curl |
Of course, this isn't the only sort of scarf which cannot be fabric-reworked. Below are two other scarves-- a cheerful, beautifully-designed flower intarsia scarf and a lace scarf--which would be ruined by drop columns or ribbing. Luckily, however, all of these scarves have had their curl straightened by this post's solution: lining.
 |
| Stockinette curl cured with a polar fleece lining |
LINING--materials
TECHknitting blog has already featured several tutorials for lining knitted garments--hats in headband style and in fully-lined style, mittens with side thumbs and front thumbs. The lining recommended in those posts is polar fleece--a wonderful fabric which does not unravel when cut, so no hemming is required. Also, polar fleece stretches--highly compatible with a stretchy fabric like knitting. However, polar fleece is not suitable to lace in style or elegance. Therefore, this post also shows a lace scarf lined in silk. LINING--how to
Here's how the multi-blue scarf was lined. The first step was to steam-block the scarf. This made it lay as flat as possible. The scarf was then pinned to a big piece of cardboard to be measured--the pinning was necessary because measuring a scroll is impossible. The lining material was cut a bit big, and then sewn in, turning a tiny bit of the fabric under as the sewing went along. The work was done using ordinary polyester sewing thread and the overcast stitch. The fuzz on polar fleece rises up to hide the stitches, so if your sewing is not technically polished, no problem--the sewing is really truly invisible on the finished project. Unlike the little stitches illustrated in the post on overcast stitches, the stitches on the multi-blue scarf are rather large: one sewing stitch per each knitting stitch of the edging. The thread was used doubled, and the needle was inserted between the yarn plies of the innermost line of edging stitches. It would be possible to simply insert the thread under one arm of the knitting stitch, as well--whether to take the sewing needle through the plies of each knit stitch or under one whole strand of each knit stitch is a matter of personal preference.
The colorful and cheerful intarsia scarf shown below was knit by Sandra Woods, (Passionateknittr on Ravelry) and the photos are used by her permission. (Many thanks, Sandra!)
 |
| Intarsia scarf before lining--all rolled up |
The before and after shows that lining was really the only option here.
 |
| Intarsia scarf after lining with polar fleece |
Further, the lining on an intarsia scarf does more than simply cure the roll. First, the floats on the back are hidden. Second, the many ends can be securely fastened without having to make the back pretty. Finally, the bright red color of the polar fleece lining adds a strong design element. A completely different effect would have been obtained, for example, by using a different color. This opens design possibilities. Matching scarves could be made for two sisters, say, of different temperament and personality. Each scarf could be identical in the knitted work but quite different in finished effect via different colored linings.
 |
| Cotton lace lined with silk |
Of course, linings are not restricted to hand-knit masterpieces such as intarsia or lace: they work very well in utility situations also. On the last post, Fibercrafter-Sally left a comment about using a knitting machine to make simple stockinette scarves for charity. Stockinette rectangles could be made on a knitting machine, then cured of their curl by being lined with polar fleece. If the polar fleece lining were stretch-stitched on by sewing machine, these kind of machine-knitted scarves could be churned out by the dozen. Some nice effects could obtained by the contrast between the yarn and the linings (and think of the matching lined flip-brim hats which could be made...)
Summary
The series started with three curly scarves, and ended with three flat scarves. |
| Before--three curly scarves |
 |
| After--cured of their curl, hanging |
 |
| After--cured of their curl--closeup |
 |
| After--cured of their curl, laying flat showing front and back |
With best regards for a happy and healthy new year--TK
* * *
This is part 4 of a four part series. The other posts are:Curling scarf rescue mission, part 1: the problem and the solutions which don't work
Curling scarf rescue mission, part 2: the drop-column method
Curling scarf rescue mission, part 3: transforming stockinette into ribbing
Book Blog Follow and Book Blogger Hop Dec 31
Happy New Year, Everyone!!
It's time for Book Blog Follow Friday hosted by Parajunkee.com and The Book Blogger Hop hosted by Crazy for Books!
My answer to this week's question: Try to keep blogging and reading fun!!

My answer: no question posted yet :)
If you're visiting for the first time, I'd love to hear from you, so please leave a comment and say hi!! :)
"Zan-Gah" Review
 "Zan-Gah"
by Allan Richard Shickman
Publisher: Earthshaker Books
Release Date: July 15, 2007
Source: sent by publisher
My Rating: 4.5 out of 5 stars
Summary from goodreads.com:
Zan-Gah, seeking his lost twin brother in a savage prehistoric world, encounters adventure, suffering, conflict, captivity, and final victory. In three years hero passes from an uncertain boyhood to a tried and proven manhood and a position of leadership among his people. Themes include survival, brotherhood, cultures, gender roles, psychological trauma, and nature's wonders and terrors. This is the electronic version of Zan-Gah: A Prehistoric Adventure, which has been awarded Mom's Choice Gold Medal for Series, the Eric Hoffer Notable Book Award, and was a finalist for ForeWord Magazine Book of the Year.
My Review:
I really enjoyed Zan-Gah's story. This book is totally unique and I think it's great to see prehistoric men and women given a voice and a story.
The book was written almost like interconnected short stories. Each chapter was like a new adventure where we met a new character or entered a new battle.
The story is about survival and coming of age, Zan grows in many ways throughout the book. I liked how he handled physical problems better than emotional ones because emotions are so hard to deal with.
The characters are all well-developed and Zan is a great hero. He stands up for what is right in his world. I also had a soft spot for Zan's uncle Chul, a lovable, simple man balancing on the edge of good and bad, and also completely ruled by his wife and child.
There is a lot of violence in the book, but it's always very clear that it's for survival. San's people respect even the animals they must kill for food or for safety. When his wayward twin Dael has a violent outburst, Zan doesn't approve. I think the right message is sent for the age group about the violence that goes on.
Main Characters: 5/5
Supporting Characters: 4/5
Setting: 4/5
Romance: 3/5
Uniqueness: 5/5
Cover: 3/5
Writing: 4/5
Bottom Line: I really recommend this book to both young readers and adults. I think you'll be fascinated with Zan's world, and surprised to see how similar it is to our own.
END OF YEAR POST
I was hoping to do more on floats this week but I'll get to it next week. Instead I wanted to look back at 2010 which was a good year overall. Knitting-wise perhaps not so much. I remember back a few years ago when I'd tally somewhere near a hundred small projects a year and this year it was more like 15-20. So that is my New Year's knitting resolution - to knit a lot more. I'd like to have more like 100 projects to show you in 2011. I have one final project to design using the gorgeous Sunday Knits yarns and then I'm going to focus on other people's designs while I work on a cookbook project.

The KP Chullo was my favorite project of the year. Here is a photo of it dry. I really like working with kits so I'm going to put some effort into finding colorwork kits to knit in 2011. I already know I'm going to get the Starmore Hat Trick kit and the Renaissance Dyeing Kilim Socks kit (3 colors per row!).
My fave design this year was my Chamrousse Gloves - I must have liked them because I knit them three times.

My favorite new book was Stephanie Van Der Linden's Around The World in Knitted Socks.
My favorite new yarn was the Stitch Nation Bamboo Ewe - I really need to order some more for a project.
My favorite online knitting discovery was Sock Knitter's Anonymous on Ravelry. I became involved last summer when my knitting mojo was pretty low and being around so many incredibly passionate knitters (with some serious knitting skills) was very therapeutic.
ONE LAST NOTE: You have until midnight (Mountain Time) tonight to vote for the Stranded forum's next KAL project. Go HERE to vote for all of your favorite projects; the KAL will start January 1.

Bubbles has made some New Year's Resolutions as well - 1) Take more bunny naps, 2) Eat more delicious treats, and 3) Insist on more jaw rubs from her two bunny slaves.
HAPPY NEW YEAR!!
Waiting on Wednesday (50)
Waiting on Wednesday is hosted by Breaking the Spine, and it is a way to show off the books you can't wait to be released!!
This week I chose:
"The Pioneer Woman: Black Heels to Tractor Wheels-A Love Story"
by Ree Drummond
HarperCollins
Release Date: Feb 1, 2011
What are you waiting on this week??
This week I chose:
"The Pioneer Woman: Black Heels to Tractor Wheels-A Love Story"
by Ree Drummond
HarperCollins
Release Date: Feb 1, 2011
The following description is from goodreads.com:This looks so great! Love the cover!! The author's website is so fantastic, and this book looks awesome with a big dose of my favorite element-romance!
"That's when I saw him—the cowboy—across the smoky room."I'll never forget that night. It was like a romance novel, an old Broadway musical, and a John Wayne western rolled into one. Out for a quick drink with friends, I wasn't looking to meet anyone, let alone a tall, rugged cowboy who lived on a cattle ranch miles away from my cultured, corporate hometown. But before I knew it, I'd been struck with a lightning bolt . . . and I was completely powerless to stop it.Read along as I recount the rip-roaring details of my unlikely romance with a chaps-wearing cowboy, from the early days of our courtship (complete with cows, horses, prairie fire, and passion) all the way through the first year of our marriage, which would be filled with more challenge and strife—and manure—than I ever could have expected.This isn't just my love story; it's a universal tale of passion, romance, and all-encompassing love that sweeps us off our feet.It's the story of a cowboy.And Wranglers.And chaps.And the girl who fell in love with them.

What are you waiting on this week??
Teaser Tuesday (20)
Yay for "Teaser Tuesday" from MizB of Should be Reading!!
Teaser Tuesdays is a weekly bookish meme, hosted by MizB of Should Be Reading. Anyone can play along! Just do the following:
 My teaser Tuesday pick:
" 'They claim you and I are fated to be enemies, and they at least implied that you can win the struggle between us. In every particular they have lied to you.' "
p 38 "The Secret History of Elizabeth Tudor, Vampire Slayer" as told by Lucy Weston
Teaser Tuesdays is a weekly bookish meme, hosted by MizB of Should Be Reading. Anyone can play along! Just do the following:
- Grab your current read
- Open to a random page
- Share two (2) “teaser” sentences from somewhere on that page
- BE CAREFUL NOT TO INCLUDE SPOILERS! (make sure that what you share doesn’t give too much away! You don’t want to ruin the book for others!)
- Share the title & author, too, so that other TT participants can add the book to their TBR Lists if they like your teasers!

" 'They claim you and I are fated to be enemies, and they at least implied that you can win the struggle between us. In every particular they have lied to you.' "
p 38 "The Secret History of Elizabeth Tudor, Vampire Slayer" as told by Lucy Weston
Deck the halls! (well three bed average)

Deck the halls! (well three bed average)
With holly
Traaaaaa lllaaaaaa lllaaaaaa la la
Merry Christmas to all.......
I'm home:-)
A little prep-ping a lot of visitors, its all wrapped and not the usual quiet Stockholm Christmas we had been accustomed too, but I can tell you, its pretty nice.
It's now knitttttttttt time.
My finished gifts are as follows many blankets, my skirts nearly there and I think that it's about time that I made my self a hat and scarf, my own Christmas gift.
To me from me. Photos to follow of gifts, funnily another post with little crochet or knit.
Basically I just wanted to say a big BIG thank you to everyone that's been part of my Big knit/mostly crochet adventure of 2010..................

With /without snow

Blythe Christmas card , for someone who's a little more organised than me.
Mine being the internet type, Merry Christmas

Elf outfit.


I'll See you all for a little more yarn adventure in 2011

Bye bye from me for 2010
Bye bye from Mabel Blythe
Inserting no-sew zippers in knitwear--the video
Here is an Interweave Knits video on a TECHknitting technique--how to insert no-sew zippers for knitwear using a "knitpicker," a tiny latch hook.
I believe these tricks can make adding zippers to knitwear much easier than methods calling for sewing. I hope you will enjoy the video tutorial of both of these new methods--chain as well as live loop. --TK
* * *
Addendum, December 26, 2010.
Valsew on Ravelry offers this very clever trick for those of you who have sewing machines. The idea is NOT to use the machine to sew with, but instead to use the sewing machine as a MARKING and PUNCHING tool along the edge of the zipper tape, as follows:
* * *
You have been reading TECHknitting blog on no-sew zippers, the video.
The video shows BOTH of the techniques illustrated in the Winter 2010 Interweave Knits article on zippers. Specifically, the chain method AND the live-loop method are demonstrated by Eunny Jang, the IK editor.
Using these tricks, an item can be STARTED from the zipper edge--TECHknitting blog just featured a 3-part KAL of a little zippered purse started from the zipper edge. Alternatively, the zipper can be added at the END of the project: once the zipper has been prepared by using the knitpicker either to make a chain OR to draw through live loops, the zipper becomes a knittable object--as easy to attach as seaming two pieces of knitting together, or attaching an I-cord edging to a sweater's button band.
* * *
Addendum, December 26, 2010.
Valsew on Ravelry offers this very clever trick for those of you who have sewing machines. The idea is NOT to use the machine to sew with, but instead to use the sewing machine as a MARKING and PUNCHING tool along the edge of the zipper tape, as follows:
- Why not use your sewing machine with a unthreaded topstitch needle for even hole spacing and prepunching, as well as a consistent distance from the edge of the zipper tape? You may match your knitting gauge by sewing on a piece of plain paper (again with no thread in the needle) and adjusting the stitch length until it matches your gauge.
* * *
You have been reading TECHknitting blog on no-sew zippers, the video.
Autumn Vines Beret in Fresco
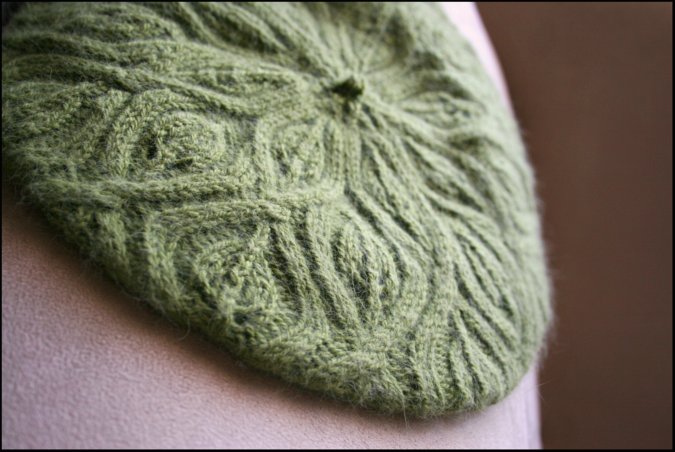
This beautiful version of my Autumn Vines beret pattern came in the mail to me just the other day. This is a test knit done for me by the talented Lily France and she did an amazing job as always!
The yarn she used was Classic Elite Fresco which is a soft, slightly fuzzy, beautiful alternative to the crisp smooth yarns that I used in the other samples. I thought I would share this hat with you to give you an idea of how the yarn can completely change the look of the pattern.
And guess what else? She got this hat out of only one skein!
Thank you Lily!
warmest Merry Christmas wishes!
"The best of all gifts around any Christmas tree:
the presence of a happy family
all wrapped up in each other."
- Burton Hillis

It was my intention to be back
with more cookie recipes
and holiday decorating,
but with only l day left
I still have some baking, knitting,
sewing, cleaning, and cooking
that I hope to get done.
So, Merry Christmas wishes
to all who have stopped by this past
year and to all the wonderful
customers who have supported
I will see you back here in the
New Year,
Deb
A Chullo for Christmas

I decided to do an additional Christmas present for DH at the last-minute - this is the Andean Chullo from the Knit Picks kit that is unfortunately no longer available. I made some changes after reading some of the Ravelry comments about the hat. 1. I added 3 colors of teal to the beige and brown colors that came in the kit. 2. I added 16 sts to the cast on number. 3. I made the hat much shorter. 4. I striped the top decrease section. 5. I made the I-cord ties longer. 6. I did thicker applied I-cord to make sure the ear flaps won't curl. 7. I used this Raveler's method for the I-cord so the cast on edge wouldn't show through the I-cord.
I think it will fit him really well - the hat is wet in the photo but I'll get a shot of him wearing it after Christmas . When I got the kit several weeks ago he was the one who decided on adding teal for some extra colors and he also specifically requested no alpacas. (There actually is a very small alpaca motif near the top - the alpacas are black - but I doubt he'll notice.) Best of all it will be a surprise because he never pays attention to what I'm knitting.
Knitting the chullo was so much fun; I immediately went and downloaded Mary Ann's Polar Bear Chullo and I think I'll get Shirl the Purl's Blossoms Chullo pattern as well. Plus I want to make another one of the Knit Picks chullos with the alpaca patterns.

Another FO is this gingerbread house we made from a kit we received as a gift. It was DH's wacky idea to use cheerios on the roof but my piping skills for the window frames were non-existent. Plus DH kept eating the candy during assembly so we ran out.

Bubbles is modeling one of her Christmas gifts - a new plush bed. She currently has about 12 in all shapes, colors, and sizes and she never actually manages to get her entire self in the bed. She prefers to position only her front half or back half in a bed or sometimes she will stretch out over two beds. It's a pretty tough life for our large white house bunny.
I hope you all have a wonderful holiday - I will try to return next week with more about floats.
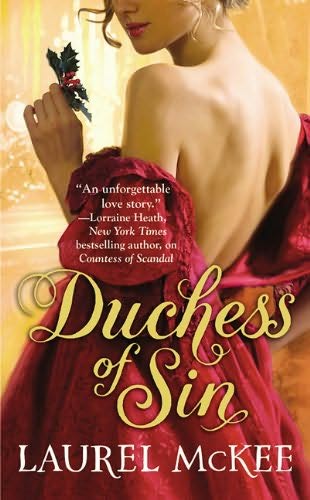
Winners Announced!! "Duchess of Sin"
Winners Announced!!
The winners of the "Duchess of Sin" giveaway are:
rubynreba
kim
cecile
marcie
deepali
deepali

Winners were chosen via random.org random number generator. Congrats to the winners!! I have emailed the winners for their mailing addresses. Winners have 3 days to respond :) A huge thank you goes out to Hachette sponsoring the contest and to everyone who entered!! Congrats!!
Curling scarf rescue mission--part three: transforming stockinette into ribbing
Here is today's problem: a tightly rolled stockinette dark blue scarf.
 The previous post in this series showed how to transform a curling stockinette scarf like this one into a lacy and delicate drop-column fabric which lays flat. However, this dark blue scarf is intended for a (not very fashion-forward) man--lace would not do in this case. Instead, this curling scarf was cured of its curl and transformed into a robust fabric, neutral enough to suit everyday fashion by all genders--a ribbed scarf.
 The basic method begins just like the drop-column fabric of the last post: a ladder is dropped lengthwise down the scarf. However, instead of leaving the ladder in the fabric, we are now going to latch the ladder up again as a column of knits against a purl background. Like the drop-column method, the ribbed scarf which results lays flat. Unlike the drop-column fabric, the ribbed fabric is sturdy and can be worked in any fiber at all, from acrylic to merino to yak.
Although many knitters may not realize, it has long been known that a 50-50 distribution of knits and purls is not necessary to break up the curl of a stockinette fabric. Many years ago, Meg Swanson (that knitting guru) introduced the "purl when you can" method for starting a color pattern right from the edge of a sweater. The idea is that working even a relatively few purls "when you can" operates to counteract curl. Applying this insight toward transforming a stockinette scarf into a ribbed one, it turns out that it is not necessary to have a 50-50 split of knits and purls on both sides of the fabric; luckily, because dropping and latching all those columns would be a lot of work. Experimentation has established that transforming every fourth column is sufficient to defeat the roll. Here is a closeup of the fabric front after the ribbing has been formed.
 Here is a comparison of the fabric front to the fabric back after the ribbing has been formed.

 You might find it easiest to hold the fabric folded in your hand, then latch up the loose ladder rungs which stick up at the fold by drawing each rung through the one below it.
 As far as spacing of the columns, this is the same as for the drop column scarf--the three edge stitches are never touched to avoid tension issues, then every fourth column is dropped. If your stitch count does not fit neatly into this system, no worries. The excess stitches are put between the scarf edges and the first dropped column where they will never show. If working out the column distribution gives you a headache, click over to this chart. which shows the best possible distribution of dropped columns across all stitch counts from 15 to 50.
Some other points: The idea for getting live stitches onto your needle, dropping the columns and binding off after reworking the fabric is identical to that for the dropped-column fabric. There are, however, three important differences in the work.
First, unlike the drop-fabric scarf, the ribbing transformation of today's post does not require the cast on to be removed. In other words, to transform stockinette into ribbing, you need only remove the bind-off, getting all the stitches of the scarf top onto a knitting needle or stitch holder, but you need not touch the stitches at the scarf bottom.
Second, it is best to drop only 1 column at a time, then latch it back up before going on to the next column, and this is especially important if your scarf is made in any fiber other than sheep's wool.
 Third, the ladders are dropped to within FIVE stitches of the bottom, rather than two as for the drop-fabric scarf. Then, at the top of each latched up column, the crochet hook is taken to the knit side of the fabric and the last five ladder rungs are latched up as knits against a knit background, rather than against a purl background. This makes the top and bottom match, and gives a neat little width-wise curl at both ends of the scarf.
One final and very important point remains: blocking. A stockinette scarf being reworked is an item already quite set in its ways, the more so if it has previously been worn and/or blocked. As you'll see when you drop the ladders down, the yarn has taken on a strong set, as shown by the evident kink. While a scarf originally worked in a k3, p1 ribbing would not curl, a scarf re-worked into this ribbing will, until you change its ways by blocking. Originally, I tried steam-blocking the model scarf of this post, but that was insufficient. Only wet-blocking with some pretty severe tugging succeeded in changing the yarn set. The scarf does now lay flat, but it did not until it was blocked.
* * *
Still to come: Not every curling scarf can have its fabric reworked: a lace scarf on a stockinette ground, or a color work scarf, for example would be ruined by reworking, and it would be hard to rework a scarf which has a special bind-off.
In the last post of this series, we'll flatten a scarf with a special bind-off: that last model scarf hanging all curled up in the middle, between its two now-flat siblings. 'til then, good knitting!
--TK
You have been reading TECHknitting blog on rolling scarf rescue, part 3


THE WHY
Stockinette curls because it is wider on the front (knit) side than on the (purl) back side. It therefore follows that if there were a more even number of knits and purls on BOTH sides of the fabric, the fabric wouldn't curl. In fact, when you look at non-curling fabrics, you see this is the case: ribbing, garter stitch, welted fabrics, basket weave, seed stitch--it doesn't really matter in what arrangement the knits and purls are: as long as there are knits and purls on both sides of the fabric, the fabric won't curl.Although many knitters may not realize, it has long been known that a 50-50 distribution of knits and purls is not necessary to break up the curl of a stockinette fabric. Many years ago, Meg Swanson (that knitting guru) introduced the "purl when you can" method for starting a color pattern right from the edge of a sweater. The idea is that working even a relatively few purls "when you can" operates to counteract curl. Applying this insight toward transforming a stockinette scarf into a ribbed one, it turns out that it is not necessary to have a 50-50 split of knits and purls on both sides of the fabric; luckily, because dropping and latching all those columns would be a lot of work. Experimentation has established that transforming every fourth column is sufficient to defeat the roll. Here is a closeup of the fabric front after the ribbing has been formed.


THE HOW
As stated above, the loose ladders are latched up using a crochet hook. The work proceeds from the back (purl) side starting with the loose stitch at the column bottom, and the ladder rungs are hooked up as a knit column against a purl background.

Some other points: The idea for getting live stitches onto your needle, dropping the columns and binding off after reworking the fabric is identical to that for the dropped-column fabric. There are, however, three important differences in the work.
First, unlike the drop-fabric scarf, the ribbing transformation of today's post does not require the cast on to be removed. In other words, to transform stockinette into ribbing, you need only remove the bind-off, getting all the stitches of the scarf top onto a knitting needle or stitch holder, but you need not touch the stitches at the scarf bottom.
Second, it is best to drop only 1 column at a time, then latch it back up before going on to the next column, and this is especially important if your scarf is made in any fiber other than sheep's wool.
 Third, the ladders are dropped to within FIVE stitches of the bottom, rather than two as for the drop-fabric scarf. Then, at the top of each latched up column, the crochet hook is taken to the knit side of the fabric and the last five ladder rungs are latched up as knits against a knit background, rather than against a purl background. This makes the top and bottom match, and gives a neat little width-wise curl at both ends of the scarf.
One final and very important point remains: blocking. A stockinette scarf being reworked is an item already quite set in its ways, the more so if it has previously been worn and/or blocked. As you'll see when you drop the ladders down, the yarn has taken on a strong set, as shown by the evident kink. While a scarf originally worked in a k3, p1 ribbing would not curl, a scarf re-worked into this ribbing will, until you change its ways by blocking. Originally, I tried steam-blocking the model scarf of this post, but that was insufficient. Only wet-blocking with some pretty severe tugging succeeded in changing the yarn set. The scarf does now lay flat, but it did not until it was blocked.
* * *
Still to come: Not every curling scarf can have its fabric reworked: a lace scarf on a stockinette ground, or a color work scarf, for example would be ruined by reworking, and it would be hard to rework a scarf which has a special bind-off.
 |
| Two down, one to go |
In the last post of this series, we'll flatten a scarf with a special bind-off: that last model scarf hanging all curled up in the middle, between its two now-flat siblings. 'til then, good knitting!
--TK
You have been reading TECHknitting blog on rolling scarf rescue, part 3
Teaser Tuesday (19)
Yay for "Teaser Tuesday" from MizB of Should be Reading!!
Teaser Tuesdays is a weekly bookish meme, hosted by MizB of Should Be Reading. Anyone can play along! Just do the following:
Teaser Tuesdays is a weekly bookish meme, hosted by MizB of Should Be Reading. Anyone can play along! Just do the following:
- Grab your current read
- Open to a random page
- Share two (2) “teaser” sentences from somewhere on that page
- BE CAREFUL NOT TO INCLUDE SPOILERS! (make sure that what you share doesn’t give too much away! You don’t want to ruin the book for others!)
- Share the title & author, too, so that other TT participants can add the book to their TBR Lists if they like your teasers!
My teaser Tuesday pick:
" She began to watch them when they were in each other's presence, and the suspicion was confirmed: Zan loved Lissa more than her. It was their embarrassment in each other's presence that betrayed them, rather than overt attentions. "
p 14 "Zan-Gah and the Beautiful Country" by Allan Richard Shickman
My New Vintage Blog :)
Hi everyone! As some of you may know, my other passion besides books and reading is vintage! So I've decided to pursue it and open my own vintage shop on Etsy!

To go along with my new shop, I have opened a new vintage blog called "In the Hammock Vintage". I want to invite all of my awesome In the Hammock readers to hop over to my new blog and see what you think!

If you love vintage like I do, you may want to stay awhile :) If vintage isn't your thing, I will still be running In the Hammock the book blog as usual so don't worry that I'll only be doing the vintage blog now!
Thanks so much everyone for reading In the Hammock for over one year now! It's been a great year for this little blog and I'm looking forward to another even better year next year!!
To go along with my new shop, I have opened a new vintage blog called "In the Hammock Vintage". I want to invite all of my awesome In the Hammock readers to hop over to my new blog and see what you think!
If you love vintage like I do, you may want to stay awhile :) If vintage isn't your thing, I will still be running In the Hammock the book blog as usual so don't worry that I'll only be doing the vintage blog now!
Thanks so much everyone for reading In the Hammock for over one year now! It's been a great year for this little blog and I'm looking forward to another even better year next year!!
Yarn Inspiration
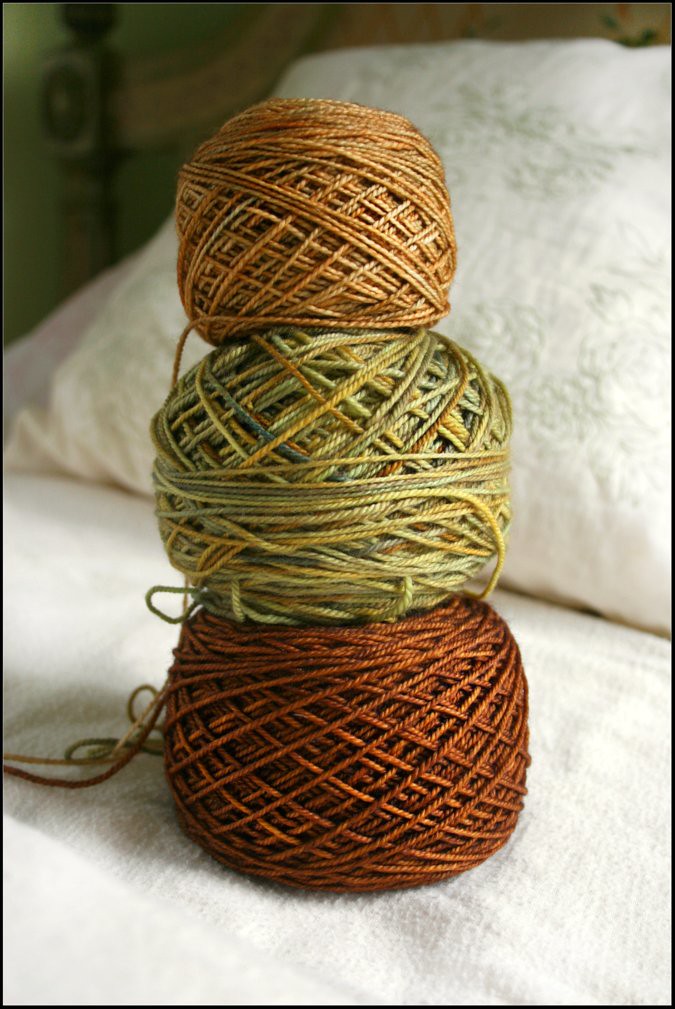 |
| From the top: Madelinetosh sock in Ginger, The Sanguine Gryphon Bugga! in Gladiator Katydid, and Becoming Art Cielo Sport in Sunlit Amber. |
Recently I've had the pleasure of working with these 3 gorgeous yarns. There is nothing more inspiring as a knitter than working with good materials in colors that you love. As I work on my newest design projects, I cant stop thinking of all of the new patterns I want to create. All I want to do these days is knit and knit and knit... and buy more beautiful yarns of course!
Winner Announced!! Artemis the Brave Swag Bag
Winners Announced!!
The winner of the "Artemis the Brave" Swag Bag giveaway is:

tanya904!

Winner was chosen via random.org random number generator. Congrats to the winner!! I have emailed the winner for her mailing address. Winner has 3 days to respond :) A huge thank you goes out to Joan Holub and Suzanne Williams sponsoring the contest and to everyone who entered!! Congrats!!
Curling scarf rescue mission--part two: the drop-column method
Here is the problem, a curling stockinette scarf made of blue and purple sparkly yarn.
 Today's post shows a method called the drop-column method, which cured the stockinette roll and made this scarf lie flat. The drop-column method could hardly be easier. Every fourth stitch, a column of stitches is dropped down the scarf length to create a ladder. Then, the scarf is steam blocked. Once blocked, the drop-column fabric goes from wildly curly to flat. Here is a picture of the front and the back of the same scarf, after the drop-column method has been applied.
Despite how easy the drop-column method is, I almost didn't include it in this series for five reasons.
Yet, despite these objections, in the end I decided to give this method its own post because it has three indisputable things going for it.

Bottom line: if you want to cure the roll on a WOOLEN scarf knit in stockinette, if you would wear a lacy scarf and if you are willing to care for a delicate fabric, let's take a look at the drop-column technique of curing stockinette roll. (If this is not your situation, remember, there are two more posts to come in this series!)
In practical terms, this means that knitting can be restyled even years after it first comes off the needles. In even more practical terms, this means that yes, you can put the stitches of an already-knit scarf back on the needles and re-work the fabric, transforming curly rolled-up stockinette into a non-rolling drop-column fabric. Here's how.
CATCH THE LIVE STITCHES at the
Basically, there are two methods. First, you can carefully unpick the original bind-off, catching each live stitch on a knitting needle as the bind-off is released. Alternatively, you can carefully snip a single stitch in the middle of the bottom row, then unravel in both directions from the middle, again catching the stitches on a knitting needle as they pop loose. Click over to the length post for further details and an illustrated how to. You only need to follow along in that post until you get the stitches situated correctly, right arm forward (third illustration, step 6). After you've gotten that far along, come on back to this post!
For the drop-column method, not only is the bind-off undone, but the cast-on is also undone. Again, this can be unpicked or snipped, and again, the length post has illustrated details (removing the cast-on is the same process as removing the bind off.) After you have the top and bottom of the scarf on knitting needles, it will look like the illustration below.


However, if you can't tell top from bottom, it really isn't all that important: Stockinette is essentially reversible, being only one-half column off between top-to-bottom and bottom-to-top (which is why, just like when you unzip a provisional cast on, you may find that you get one less stitch working "up" (top needle) than working "down" (bottom needle) . Whichever way you run out the column of stitches, though, you will get a ladder.
If math is not your strong point, you can click through to this chart which shows where to slip stitches and where to drop them in order to distribute the columns as evenly as possible for all stitch counts between 15 and 50.
The illustrations below shows the chosen stitches dropped off the holding needle and run down three stitches. The left picture is unstretched, the right, stretched.

At the bottom of each dropped column, stop the ladder two stitches from the bottom, and catch the loose stitch on a safety pin or stitch holder. You don't want to get any closer than two stitches or you run the risk of making a hard-to-fix loopy mess.
To get from "before" to "after," as you make each section of the scarf steamy with the iron, spread it apart with your hands by gently patting it wider. When the steam dries away, the rungs will remain in the relaxed, open position shown in the after photo.

If you compare the blue to the red, you'll see that the red scarf was knit tighter, and its yarn did not relax as much from the steam-blocking. As a consequence, the red scarf's ladders are narrower and the fabric came out more wavy (bumpy) in cross section. However, the stockinette curl has been cured on both scarves by the drop-column method, and both have been transformed from tight unwearable tubes into (delicate! lacy!) flat scarves.
'til next time, good knitting
--TK
You have been reading TECHknitting blog on curing curling scarves, part 2

 |
| Front and back |
- It really was designed for WOOL. If you try this method on any fabric except wool, you take the chance of RUINING YOUR SCARF, yes, maybe R.U.I.N.I.N.G. it FOREVER. You have been warned--the drop column method is for wool alone!
- The finished look is quite lacy, not a look suitable for all situations.
- The technique is rather primitive
- The resulting fabric is delicate--it snags easily, for example
- When the time comes to wash it, a drop-column scarf needs to be handled with the UTMOST care: hyper-gentle hand washing, laid flat to dry, NEVER, EVER in the washing machine.
Yet, despite these objections, in the end I decided to give this method its own post because it has three indisputable things going for it.
- IN WOOL, it really, really works.
- It is really, really easy.
- It is really, really fast.

Bottom line: if you want to cure the roll on a WOOLEN scarf knit in stockinette, if you would wear a lacy scarf and if you are willing to care for a delicate fabric, let's take a look at the drop-column technique of curing stockinette roll. (If this is not your situation, remember, there are two more posts to come in this series!)
MY SCARF IS ALREADY CAST OFF--CAN I RE-WORK IT NOW?
Are you surprised to see a method using live stitches recommended for restyling an already-finished scarf? Way back in 2006, in the second TECHknitting post ever, knitting's inner nature was discussed. That post stated that any single knit stitch maintains its connection with all the other stitches in its row and its column, even after the knitting process is complete.In practical terms, this means that knitting can be restyled even years after it first comes off the needles. In even more practical terms, this means that yes, you can put the stitches of an already-knit scarf back on the needles and re-work the fabric, transforming curly rolled-up stockinette into a non-rolling drop-column fabric. Here's how.
CATCH THE LIVE STITCHES at the
TOP and BOTTOM of the SCARF on
KNITTING NEEDLES
Restyling knitting is actually fairly common. For example, re-working the length of a garment (making it shorter or longer) has already been dealt with in an illustrated post. The first step in length-restyling is the same as in fabric-restyling: getting the stitches back on the needles.Basically, there are two methods. First, you can carefully unpick the original bind-off, catching each live stitch on a knitting needle as the bind-off is released. Alternatively, you can carefully snip a single stitch in the middle of the bottom row, then unravel in both directions from the middle, again catching the stitches on a knitting needle as they pop loose. Click over to the length post for further details and an illustrated how to. You only need to follow along in that post until you get the stitches situated correctly, right arm forward (third illustration, step 6). After you've gotten that far along, come on back to this post!

MAKE SURE YOU HAVE ENOUGH YARN TO USE IN YOUR BIND OFF
In the illustration above, note the mini-skein of yarn at both ends of the scarf. If you don't have any excess yarn from the scarf in your stash, then when you put the live stitches on your needles, you must unravel an additional two rows, in order to have enough yarn to bind off the top and bottom when the restyling is complete.The model scarf used up all the yarn, so the mini-skeins represent the top and bottom two rows which were unraveled and are being held in reserve for the bind-off.DIRECTION OF DROP
Usually, ladders are dropped in stockinette top-to-bottom, rather than bottom-to-top. If you are having a hard time telling which is which, you will see that there is an odd sort of half-stitch at the very edge of the bottom, which is absent at the top. In the illustration below, the half stitch is shown--it is the little extra purple stitch peering around the left side of the "real" blue edge stitch.
However, if you can't tell top from bottom, it really isn't all that important: Stockinette is essentially reversible, being only one-half column off between top-to-bottom and bottom-to-top (which is why, just like when you unzip a provisional cast on, you may find that you get one less stitch working "up" (top needle) than working "down" (bottom needle) . Whichever way you run out the column of stitches, though, you will get a ladder.
SPACING THE COLUMNS TO DROP
The edge three columns are not worked in any way--we leave them alone to avoid stirring up tension issues at the side edges of the scarf. Across the rest of the scarf, the idea is to drop every fourth stitch (3 stitches undropped, followed by a ladder). If your stitch count will not fit evenly into these constraints, not to worry--the excess stitches are hidden between the edges of the scarf and the first dropped column on each side. The edge flips over 180 degrees at the first dropped column, perfectly hiding any excess stitches.If math is not your strong point, you can click through to this chart which shows where to slip stitches and where to drop them in order to distribute the columns as evenly as possible for all stitch counts between 15 and 50.
The illustrations below shows the chosen stitches dropped off the holding needle and run down three stitches. The left picture is unstretched, the right, stretched.

At the bottom of each dropped column, stop the ladder two stitches from the bottom, and catch the loose stitch on a safety pin or stitch holder. You don't want to get any closer than two stitches or you run the risk of making a hard-to-fix loopy mess.
BIND OFF the SCARF BOTTOM
When you have run out all the columns, take a free knitting needle in your right hand, and the holder needle with the bottom stitches in your left hand, then bind off the bottom of the scarf--the chain bind off is very good for this situation. As you come to the loose stitch at each column-bottom sitting on its holder, undo the holder and place the held stitch on the tip of your left needle, then bind it off together with its left-hand partner, two stitches bound off as one. BIND OFF the SCARF TOP
The next step is to bind off the top. Bind off the ordinary stitches in the usual manner. When you come to the top of each ladder, grab it with your fingers and twist it into a backwards loop, then place the loop on the left needle. This twisting maneuver transforms each ladder's top rung back into a stitch capable of being bound off. Bind off all the top stitches including the twisted loops. Again, chain bind off is a good choice.STEAM BLOCK the SCARF
The last step of all is to steam block the scarf. Below are before and after photos of the fabric--the before represents the look of the fabric when the columns have been run out, but not yet steam-blocked, the after shows how the scrunched-up ladder rungs blossom open from the blocking process. |
| The ladder rungs, before and after steam blocking |
To get from "before" to "after," as you make each section of the scarf steamy with the iron, spread it apart with your hands by gently patting it wider. When the steam dries away, the rungs will remain in the relaxed, open position shown in the after photo.
WHAT WILL MY SCARF LOOK LIKE?
The sparkly blue sample scarf corrected in this post came out quite loose and lacy. This is partly because it was knit loosely, partly because the yarn was of a nature to easily relax during the steam-blocking process. Pictured below is a different drop-column scarf, this one in red, which came out a bit differently.
If you compare the blue to the red, you'll see that the red scarf was knit tighter, and its yarn did not relax as much from the steam-blocking. As a consequence, the red scarf's ladders are narrower and the fabric came out more wavy (bumpy) in cross section. However, the stockinette curl has been cured on both scarves by the drop-column method, and both have been transformed from tight unwearable tubes into (delicate! lacy!) flat scarves.
STILL TO COME in this series
The next (third) post in this series will feature a method which works for all fibers, which is more robust than the drop-column method shown here, and which does not end up with a lacy look--a method more suitable to everyday use by all genders. The last (fourth) post will show a method suitable for scarves which can't have their fabric re-worked: a lace scarf on a stockinette ground, for example, or stockinette color work.'til next time, good knitting
--TK
You have been reading TECHknitting blog on curing curling scarves, part 2
Subscribe to:
Posts (Atom)