goodbye March

Goodbye March,
and thank you for going out like a lamb.
I am enjoying the warm sunny day as I work in my gardens--raking, raking, and some more raking. The hyacinths, tulips, and daffodils are all popping up.
It's so good to get outdoors!
I am taking time off from Spring Cleaning for this Holy Week.
But I promised pictures of the clean and organized master bathroom,
so here they are--sorry for the poor lighting...

~ an old bowl to hold soaps


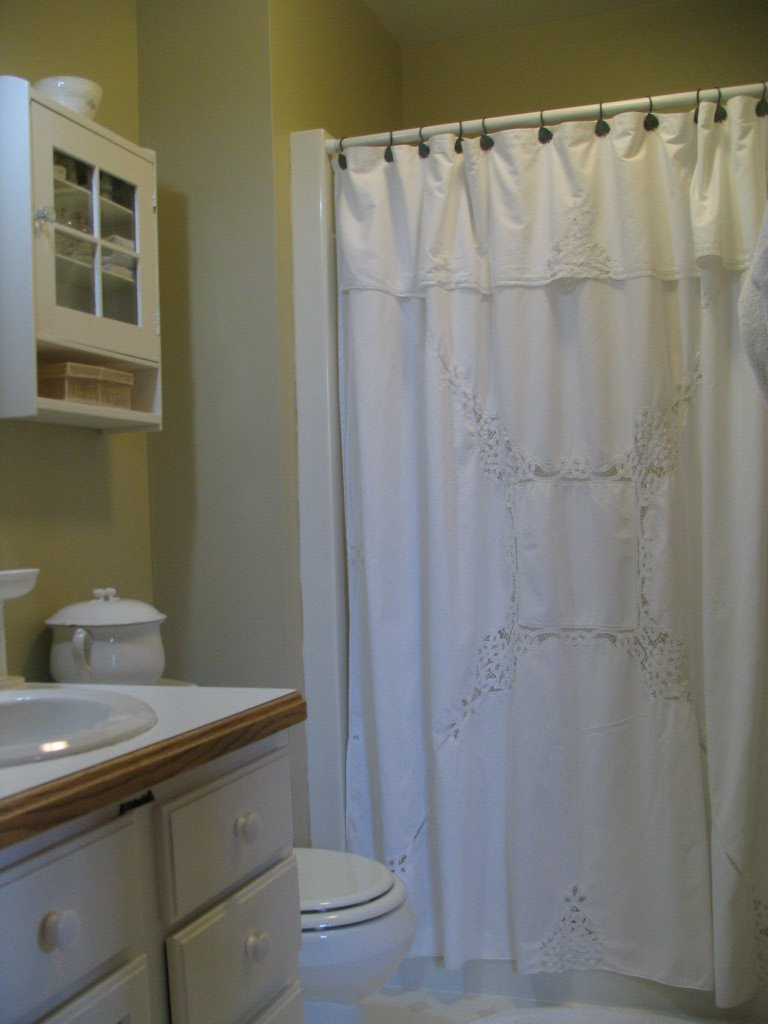
{towel rack made by Mr. A}


~ a favorite flea market cabinet


~ oops, forgot to refill the little bottles


Back to the 'spring cleaning house tour' next week.
Hope this warm sunny weather is coming your way too.

My New Knitting Basket

Here is my new knitting basket. After looking at various web sites (thank you so much for all the recommendations!), I ended up going with something from Pottery Barn anyway. This is the Havana model I think. There's also the Savannah which is the same style basket in a lighter color.


I chose it for the size (actually I was even hoping for something larger) and the lid. In magazines you always see these perfectly organized knitting baskets with color-coordinated skeins of yarn all exactly the same size but my knitting collection tends to be much more chaotic so a lid is appreciated. So far Bubbles the rabbit seems uninterested in chewing it.


I'm getting very excited about Easter. I've always loved Easter but this year it is even better because it is also the first Major League Baseball game of the season. Those four hour Yankees/Red Sox games are great for getting some serious knitting done.

This week I have been mostly..........


This week I have been mostly..........


I set the challenge that I'm not aloud to start any new projects , but that did not include me fixing an old project that I simply just was not happy with.

My Home Sweet

It had a bumpy middle and now that I have really perfected the lettering, I knew that I could have done it better,( I dreamt about it, call me committed) so as if do not have enough to complete. I added in an oldie to fix up, it will not take long;-(.

So yes I am (STILL) over achieving and not learning.......

The up earlier and bed later , really is not helping.
I must work on my over commitment and lack of time management.

Also to stop thinking up new things, Hansel and Gretel(Hans och Greta) Graffiti day yesterday turned out to be an afternoons work, that I had not allowed for;-).

Post to follow


Art and Knit

Completed in crochet.


Packaging dress sleeve
's


From this to this!

But how......

That is the question?

A WIP


A new project........

I know I make the rules I can break the rules, its just when a project is one that you have to think about. (my OCA dgree work!)

Then I need time off as the dress is a little stress.

The knitted graffiti from Christmas I have hung.

So I needed , new and easy.

So the star below is in fact 8 of what will be 20 arm cuffs for the stick structure below, below.


Size 8

25 stitches? ish

Then a few rows, easy.

Spring has not sprung enough yet for the buds,

So I need to add a little more colour on my walk home.


For the Stockholmers, do you know where this is?


Marie Antoinette


Colours and Inspiration.

I think that this movie was released in 2006, why I'm a little late getting into it.

This was the year I came to stockholm and totally missed it.

I caught a little on TV a while back , hooked.....ordered it from Amazon.

And got the whole movie experience and I love it.

(Even more than New Moon I have to say;-()
(It's one of my favourite books but the movie ,not so gripped as Twilight)


Vintage Vogue Knits (Issue 63)


Vintage Vogue

(A Happy Gift)

And a gift from Susan
(My now favourite Friday knit cafe member)


She saw it on a trip to UK and thought of me, made my day.

I just Love them.

The pictures,

the smell,

the adverts,

the feel,

and the classic patterns,

that haven't really changed at all in years since 1st published.


Gadabouts (Never heard of this, so I Googled)

Noun1.gadabout - a restless seeker after amusement or social companionship


Lovely , lovely vintage adverts.

Dering Street, I even like the street name.


Lovely coat, this is one of my I will make one day, so Channel.

So classic , So glamorous.


Timeless cardi.


I love the model poses,

why, because nowadays the models look natural, everyday.
(This is ok)

I like the stiff, proud I'm in a fabulous vintage vogue knit look.

(Or though at the time just knit)

Only vintage now.


Only in Vogue does the Hedge-hog hat look glam.


This is a three page ad that pulls out from the middle of the booklet.

Such beautiful colours and a textiles almost, what's it about.........

Bernat Klien (facts)


Cake stand yarn

I may have posted this picture once before, I have few vintage books in my collection.

This concept is widely used today, yarn on a cake stand.


For me this is also something that when I eventually get my vintage cake stand and yes I know a cake stand..........

The thing is I can just never commit, I like the funky modern, yet I love the traditional antique china type (traditionally used for afternoon tea).

decisions, decisions and the funny thing I'm not really a cake baker, so it would be entirely for my yarns a shelf storage if you like, for the ones that I favour most at the time;-)


Make head way with STRATNOID (knitting pin?)

I couldn't find anything about this make but this is a knitting needle history if you like.

http://en.wikipedia.org/wiki/Knitting_needle


I
have been unsuccessful in find a print date as I could not see one;-( so a little more research is needed. If their are any vintage knit vogue enthusiasts reading my blog please let me know, how old my latest little knit Gem is that now thanks to Susan is added to my collection.

Uneven knitting part 3--fixing the loose knit column in ribbing, textures and cables

includes 8 illustrations
After a recent TECHknitting post on bunching and too-long runs, Ruth C. wrote:
When I knit columns switching from knit to purl (such as a basket weave pattern) one column is always looser-looking--I think the problem is always switching from knit to purl but switching from purl to knit doesn't have the same problem.
Judi P. followed up:
My daughter was so frustrated last year with this [same] problem with her 2 x 2 ribbing that she hasn't tried to knit a sweater since. (So sad!)
Giving up knitting? That IS sad. However, this problem is fixable. This post show 4 tricks, and one will surely work.

Solution 1--knit tighter.
The simplest quick-fix is to knit tighter. Simply using smaller needles will put so much less yarn into each stitch that the loose column of stitches will magically fix itself. This is actually an excellent solution for sweater bands--bottom or neck, and also for cuffs and hat brims. Cast on properly and knit very firmly on small needles, ribbing transforms into a stretchy, elastic fabric, with stitches laying in very smooth and even columns.

Pros and cons: While this is an excellent solution for cuffs, brims and bands, it is not a good solution for all-over textured fabrics, such as all-over ribs, basketweave, cables, etc. Tight
knitting all over the whole fabric would result in stiff, tight fabric, as well as hand cramps--not fun. Further, even for bands, casting on loosely but knitting tightly is also a trick which must be mastered for this fix to work--a tight cast on will result in a nose-scrapingly unpopular and unwearable garment.

* * *
Luckily, knitting tightly is not the only fix. There are 3 further solutions, but before we get to them, let's take a closer look at the problem.

In all the diagrams of this post, purple means the stitch appears as a knit on the "front" face of the fabric--the public side--the side which will be seen when the garment is worn. Blue means the stitch appears as a purl on the "front" face of the fabric. As you know, knitting is very
zen-- "what has a front has a back," as the Zen masters say. This means that when the fabric gets flipped over, the purple stitches, although knits on the front, will appear as purls, and the blue, although purls on the front, as knits.

In illustration 1, we are looking at the front face of the fabric. The dark purple column is the last knit column which appears just before the column of purls. These dark purple stitches are where the problem lies: This is the column of stitches which get all stretched out and floppy looking.

The first column of purls next to the knit column is dark blue. The red dots on the dark blue stitches in the first purl column show that these purls are the ones we are going to operate upon to fix the problem. That's right: The problem is with dark purple KNIT column, but in the remaining three solutions below, we are going to fix it by operating on the dark blue PURL column.


* * *

Solution 2--run out, then latch up

T
he idea of this solution to make your project working the purls and knits without doing anything different than you normally would. When the project is done, the fix comes in, and here's how.


  • Slip the stitches between one needle and the next until you are right over the dark blue column. Let down a giant (scary looking!) runner.
  • Once the ladder has been let out to the bottom of the fabric, it will be latched up again, using a crochet hook (you could also use a latch hook). As you latch the darker blue column back up, give a mighty yank on each rung of the ladder. As you can see in Illustration 2, the fabric has been flipped over for the latching process, because it is easier to latch up a knit column than purl one. By giving a mighty yank on each rung of the ladder as you latch it back up, the loose stitches in the dark purple column will tighten up nobly as the excess yarn gets yanked out of them into the stitches of the dark blue column. It is, of course, true that the dark blue column will become distorted from the excess yarn being yanked into it, as well as from the act of yanking itself, yet this is actually not so bad. The dark blue column ends up being a purl column on the front face of the fabric, which means it recedes into the fabric, and therefore will not be noticed.
A note about the illustration: The illustration shows the runner let down all the way to the bitter end, to the cast on stitch itself, then latched back up. However, it might be safer to stop a row or two above the actual bottom edge, to avoid the problem arising from the cast off untwisting.

Pros and cons: This trick is very easy and requires nothing to remember as you work on your project. However, it has three major limitations.
  • First, it works best in "sticky" fibers like the various types of non-superwash wool, because in those fibers, the stitches will stay pretty much as you yanked them. However, in slick fibers such as acrylic, cotton, bamboo, superwash wool, alpaca, silk and the like, this trick will not work very well because the fibers will slide around as you wear the item, and the excess yarn will be yanked back out of the dark blue stitches, eventually to spread out again. For slick fibers, solution 3 or 4, below, are better.
  • Second, this trick is not very good for reversible items like scarves and afghans--the distorted dark blue column of stitches will hide on one face of the fabric, but will show on the other. Solutions 3 and 4 solve this problem.
  • Third, this trick really works only if the columns to be run-out-and-latched-up stay in place, so that one column can be let out all the way to the bottom. If the loose dark purple column of stitches travels across the fabric face--traveling cables, for example--solution 4 is best.
Solution 3--latch up out of the fabric

This solution is very similar to the first, but will work on slick fabrics. Here's how:


  • The base stitch for the dark blue purl column is placed on a safety-pin or other holder at the very bottom of the work, as shown in Illustration 3. You then work the garment, decreasing the stitch count by one, and remembering not to purl that column.
  • When the knitting is all finished, turn the work over, so that you are working on the back fabric face. Now go back down to that lonely stitch on the holder waiting at the bottom. Per illustration 4, latch up the whole dark blue column, taking the rungs of the ladder right out of the fabric itself--shown in red. The red dot on the dark blue stitch just above the cast on shows that that stitch was latched up out of a ladder rung--the same ladder rungs that were red on illustration 3. Latching the whole dark blue column of stitches out of the fabric absolutely tightens up the adjoining dark purple column of loose stitches.

Pros and cons: Like solution 2, this trick works well for
cables or ribs running lengthwise (not traveling). Unlike solution 2, however, you must remember to alter your pattern. Specifically, you must remember to delete the dark blue column from your work, then remember to latch it in afterward. When using this method, be sure to swatch and measure a fully-latched-up sample, as the latching pulls quite a bit of yarn up, making the fabric narrower. For a single cable, this might not make a noticeable difference, but for multiple cables/ribs it certainly would.

Solution 4--Slipping

Unlike latching, slipping is done as-you-go. This trick is is slow to work at first, but once up the learning curve, you can knit this trick as fast as any other knitting. Unlike Solutions 2 and 3, this will work splendidly on any sort of columnar-based fabric, even short columns like basketweave, and even columns which wander, like traveling cables.

The essence of this trick is the same as solution 1--knit tighter--but with this trick, the tighter knitting is confined exactly to the point it is needed: the dark blue purls alongside the dark purple column of loose floppy knits. Here's how, assuming a 2x2 ribbing in circular knitting already cast on your needles:


  • Round 1, step a: place marker * K2 (light purple, dark purple). Per illustration 5, Slip next st (first purl stitch--darker blue) with yarn in front. Slip the stitch "open," that is: purlwise, not twisted. Step b: P1 (second purl stitch--lighter blue). Repeat from * all the way around first round. The slipped bar which results in front of the dark blue first purl stitch is shown in red in illustration 6.


  • Round 2: starting from marker *K2.Move the running yarn out of the way. In illustration 7, it is shown pulled straight up. Once the running yarn is pulled out of the way, fish around with your right needle and draw the bar (bar=red yarn slipped on the last round) through that first purl stitch, in a manner which purls the stitch with the bar (ie: do not twist the stitch OR the bar, just draw the bar through the purl from front to back as shown). Next, bring the running yarn back into play, and use it to purl the second purl stitch in the normal fashion. Repeat from * all the way around. If you look at your fabric, you will see that by using the bar to purl the first stitch in the purl column, rather than the running yarn, you have set up the running yarn to be the bar for the next round, as shown in Illustration 8. In other words, in every round, you use the bar remaining there from the slip in the previous round to actually purl the stitch, and you set up a new bar for the next round by simply slipping running yarn across the dark blue column rather than purling with it as is normally done. One more note: the red dot on the dark blue stitch in illustration 8 shows that stitch was created out of the bar illustrated red in illustrations 5, 6 and 7.
  • Repeat round 2 over and over again for the rest of the ribbing.
  • For the very last round of ribbing before bind off, draw the bar through each first purl stitch of each purl column AND THEN PURL it with the running yarn (2 st worked in dark blue purl column).This corrects the row count so that the dark blue column has the same number of rounds as all the other columns.
  • Bind off or continue in a different pattern, as desired
After you work this sample, you will see how to adapt it for ribbing other than 2x2 and for cables, etc.--basically, the first stitch in the dark blue purl column the one being operated upon by slipping as set forth in the instructions for round 2.

The idea is to avoid putting excess yarn into the fabric in the first place. By slipping the stitch, the resulting bar puts into the fabric only a small portion of the yarn a full stitch would add to the fabric. Pulling this short length up into an full stitch on the next round tightens the adjoining knit stitch by permanently yanking the excess yarn out of it.

Pros and cons: For improving all-over ribbing or for all-over cable or basketweave patterns worked in the round, this is the best trick I know. Although this requires close attention to go up the learning curve, this slipping trick can become quite fast--second nature, actually, if you work at it. However, even this nifty trick has its limitations.
  • First, in thin or splitty wool, or in poor light, or on dark colors, catching the slipped bar below can be frustrating.
  • Second, in back-and-forth knitting, the bar of the slipped stitch is on the back fabric face (away from you) on the return trip, because the purl column, as seen from the back face of the fabric, is a knit. Catching a bar from the back and leaving a new bar back there is frustrating, and isn't ever going to be as fast as catching a bar stranded across the front. Therefore, this trick really only works in circular knitting. For back-and-forth knitting, solution 2 or 3 will work better.

Geek notes
For those that want the nitty-gritty.
  • Combining techniques: solutions 2 and 3--latching--are bad ideas if the column to be latched up is going to tangle with the garment shaping. However, on a sweater with cables running up the length, where the cables first become involved in the garment shaping at the neck or armhole edge, you can work your project as far as the shaping, then latch, and then switch to solution 4--the slip method--once the shaping starts.
  • In all the solutions except for 1, the excess yarn is yanked out of the loose floppy stitch once the the knit stitch concerned is off the needles. This removes excess yarn in a manner impossible if that stitch was prevented from shrinking by being forced to stretch over the barrel of the needle. In other words, neither yanking hard on the loose knit stitch nor on the following purl stitch will work to eliminate the excess yarn, because the barrel of the needle prevents either from shrinking down past the size dictated by the barrel's diameter. Once released from the needle, however, giving the loose knit stitch a mighty yank (whether delivered by latching or slipping) will tighten it up tidily.
  • Solutions 2 and 3--latching--are cousins to CHM--the Crochet Hook Method--for tightening up loose left-leaning decreases. Solution 4--slipping--is cousin to Cat Bordhi's "hungry stitch."
  • Other solutions are possible through changing the stitch mount and also through twisting the dark blue purl stitches. However, stitch mount, twisting and the related subjects of combination- and other alternative types of knitting are being put off a future series of posts, so those solutions are not included here.
A BIG thank-you to Carol (Rududu) and to Jane (Maidenhair) for test-knitting Solution 4.

* * *

This is part 3 of a series on uneven knitting. The first two posts are:
Fixing uneven knitting part 1: stockinette fabric--how to tame "rowing out"
Fixing uneven knitting, part 2: bunching, big stitches and lumpy fabric--the problems of too-long runs.

--TK
You have been reading TECHknitting on: purl after knit, tightening up the loose stitches.

spring cleaning house tour ~ master bedroom

I may not have gotten into every nook & cranny, but I think I came close.
When I took the curtains down I saw how faded they are in spots--maybe I'll make new ones, someday.

To answer some questions, I use a mild soap and hot water for the walls and ceilings. If the ceiling is tiny, like the bathroom, I do wash it from a stepstool by hand. A larger ceiling I would definitely use a clean sponge mop. Many of our ceilings are textured, so washing them is out. And, Mrs Meyers soap can be found here online or there are also some stores.


Time for a rest...I'll be back soon with the bathroom pictures.

signs of Spring & sewing

Some signs of Spring indoors ~

~pussy willows in an old yellow vase

~a yellow striped linen tablecloth

~a lemon cake {recipe from The Gentle Art of Domesticity: Stitching, Baking, Nature, Art & the Comforts of Home }

And,

there are a couple new totes in the shop::

... one large roomy vintage barkcloth tote

...and one medium-sized tote made from a vintage cotton tablecloth.

Have a great weekend!