includes a how-toGAUGE, EASE and FASHION--
or "WHY DOESN'T MY HAND KNITTED SWEATER FIT?"
Knitting any pattern for the first time is an act of faith. You see a pattern. It appears on a model, cunningly displayed on a chair, or hanging at the LYS. Through some combination of experience, fashion sense and hope, you decide that although you aren't a model, a chair, or a hanger, that sweater will surely look as well on you.
You buy the yarn, you buy the pattern, you cast on. You switch needles 3 times until you get the exact gauge. You work diligently, keeping the gauge perfect all through the sweater. You assemble your masterpiece--and--well, um.
Your new sweater fits best if you don't button it and looks most modest if you don't breathe, or at least, don't breathe deeply around men other than your husband. And forget about raising your arms. It fits your daughter well enough though, so it goes to her. Not a disappointment, exactly, because she does look good in it, and modest too, but a sweater for your daughter is not what you were aiming for. What went wrong?
I am here to absolve you. It isn't your fault. It wasn't an error in your gauge--there was insufficient "ease" in the pattern to get the fit you were looking to get.
EASE
So what is ease? Well, when you buy a sweater at the store, you try a few on. Perhaps you find that even among garments from the same manufacturer, you prefer a size 6 sweater, while in a different model, a size 4 might fit better, you skinny thing you. Assuming we are not talking high-fashion sweaters here, the difference between the way the two sweaters fit is due to their "ease."
Stated otherwise, "ease" in a technical sense does not refer to lolling about watching TV while eating bon-bons. It refers to the amount of extra room inside your clothes--how much looser your clothes must fit than your skin does, in order that you do not tear your clothes (or compromise your dignity) every time you lift your arms, turn around, sit down. It is the amount of extra room which allows your clothes to slide and glide becomingly as you move around.
FASHION
Confusingly, the concept of ease often runs right into the concept of fashion. If you were to look at one high-schooler in each of the two major genders, you must blame fashion, not ease, for the fact that his pants could conceal himself and two friends (one in each baggy leg) while her pants can barely conceal herself. Fashion, not ease, dictates his pants are ready to fall off the edge because they are too loose, while her pants are ready to do the same for the opposite reason. Yet, even if both were dressed as their mothers would like them to be, it would be ease, not fashion, that dictates her pants must be cut broader in the beam than his, and that his pants must, regardless of fashion, be cut looser in the crotch than hers, at least if he desires to father viable offspring in the future, if you catch my drift here, ladies.
Leave aside fashion and assume that we knitters are persons of distinction seeking sober well-fitting garments. We still might not get what we want when set out to knit a sweater, because we might not consider how much ease we actually like to have in our clothing. And even if we do know how much ease we want in our clothing, we might not know how much ease the pattern creator allowed. When we leave sobriety behind and add fashion to the equation, we step ever further away from any assurance our laboriously hand-knitted garment is going to fit in an attractive manner. Obviously, what is wanted is the baby bear's amount of ease--not too much, not too little, but just right. But how to find it?
HOW TO MAKE SWEATERS THAT FIT
Here is the trick. Do NOT measure your BODY. No. Or at least, not yet--not first. Instead, go and measure your favorite sweater/hat/gloves/whatever it is you are trying to knit. That's right. Do not wrap the tape measure around you--use it to measure your favorite garment, instead.
click picture
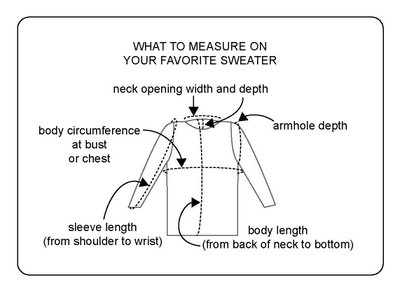
The reason you love that garment is because it fits you the way you like clothes to fit. And that fit is something you can analyze. How big around is the sweater in the area of your bust? How big is your actual bust? The difference is the amount of ease you prefer in a sweater. Are you surprised that it might be as much as 8 inches, and maybe even 10 inches in a heavy jacket-type sweater? I know I was when I first started knitting sweaters.
How long do you want that sweater to be--do you want your "hips" (speaking euphemistically here) covered, or do you find that a garment grazing your belly-button is quite long enough, thank you? Better be sure that the sweater you are making is long enough to cover what you want covered (and only that). The best way, again, is going to be to measure your favorite sweater. Ditto sleeve length, ditto shoulder span, ditto neck hole width and depth, ditto v-neck depth and angle.
How about the depth of the armhole? My sister, a very thin work-out type person who wears a preposterously small size for an adult, just gave my young teenage daughter a very expensive Norwegian tapestry-knit sweater she originally bought for herself. It fit my sister very well everywhere except for the depth of the armholes. The armholes were too shallow, causing the sweater to bunch unattractively under my sister's (thin) arms. In other words, even assuming the garment you want to knit has the same armhole style as your fave, what is the armhole depth of your proposed creation?
click picture
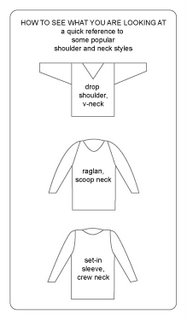
Now let's add fashion to the equation: Look at the shoulder--are all your favorite sweaters drop shoulder? If so, why assume that raglan sweater you are planning to knit is going to be flattering? A drop shoulder sweater typically hangs so the shoulder seam lies some inches past your natural shoulder--a shoulder-broadening boon to the narrow-shouldered. A raglan sweater has, technically speaking, no shoulder at all. The wearer's shoulder defines the sweater's shoulder. A narrow-shouldered person accustomed to depending on their sweater for a few extra inches of shoulder-broadening might possibly look like the
nose-cone of a ballistic missile in a raglan sweater (ask me how I know...). On the other hand, a broad-shouldered swimmer looking to minimize her shoulder span might look equally ridiculous in a drop-shouldered sweater--like she changed her sport to football and forgot to take off the pads.
OK, enough philosophy. Here's where the rubber meets the road. Before you knit a sweater from a pattern, be SURE that the pattern gives the FINISHED GARMENT SIZE in inches (or centimeters) not just in dress sizes. If the pattern does NOT give the finished garment size, you proceed at your own risk and have a lot of detective work in front of you. Where finished garment sizes ARE provided, USE THEM. If you are a size 10, and the finished garment size for size 10 differs from your favorite sweater, you must disregard the size designation--DO NOT KNIT A SIZE 10. No. Do not. Knit the sweater which will give you the finished garment size, measured in inches (or centimeters) closest to your favorite sweater. This way, regardless of how much ease the PATTERN MAKER thought would be appropriate, your finished sweater--whether it is labeled size 8 or size 14, will fit YOUR notion of how much ease is appropriate to YOUR body.
You may have to do some detective work to figure out some of the dimensions of the finished garment--the armhole depth is typically not given in American patterns (although it often is in European ones). You may have to work backwards from the pattern directions (so and so many rows, at such and such a row gauge) to determine the armhole opening depth. (Hint: your LYS lady (man?) is a great resource here, and it is for this service that you should be HAPPY to pay them more per skein than you could pay for that same yarn on the internet.) (Conversely, if this is all beyond the LYS personnel, think about finding a different LYS.)
A caveat: The heavier the fabric, the greater ease required. If your favorite sweater is lighter weight than the weight of the sweater you are planning to knit, you will have to add ease so the thicker sweater fits as well as the thinner sweater does. Conversely, if your favorite sweater is heavier in weight than the sweater you are planning to knit, you must subtract ease to get to the right fit. How much ease to add or subtract is, of course, a judgment call, which is why the very best way to get a good result is to use a sweater in the style and weight you want to make as your taking-off point.
click picture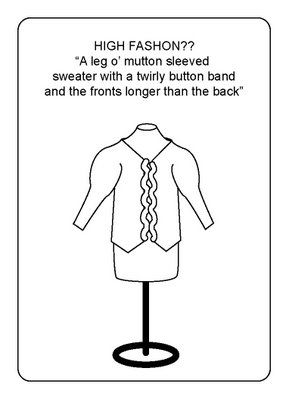
Another caveat: Very high fashion styling puts paid to all the foregoing because, unless you already own a leg-of-mutton sleeved sweater with a twirly button band and the fronts longer than the back, you really have nothing against which to measure your proposed new handknitted leg-of-mutton sweater with etc. (And if you did possess such a creature already, it might be unlikely that you'd require another.) In such a case, perhaps a foray into a modish department store or boutique and some surreptitious activity with your tape measure in the fitting room will lay the necessary groundwork to assure a better fit when this eventual fashion masterpiece rolls from your needles.
A final thought: If you used the same yarn and needles to make your next project, you'd be ahead of the game. You already have a big, big gauge swatch in the sweater (hat, mittens, whatever) which you made first. You have an important body of knowledge and experience gleaned from working with that yarn and those needles. You know in the core of your being what X number of stitches look like after they come off the needles. With this information, you're far more likely to make a fitting garment the second time through than you were the first time around.
After all, think on traditional folk knitters: unlike modern knitters, they didn't use a different yarn and different needles for each project. In fact, most had access to only one weight of yarn, and they used the same needles over and over again. I don't advocate that every sweater you ever make ought to be in the same yarn as you used for the first one, but you will get an increasingly professional-looking result with each project for which you use the same yarn and needles.
--TECHknitter
 In my kitchen I have a bowl of wine corks that I have been collecting for years. I just love the look of them, but have never come up with anything practical to do with them...
 ...until now. I was looking through 'The Decorated Page: Journals, Scrapbooks & Albums Made Simply Beautiful' by Gwen Diehn. This book has the most gorgeous examples of journals and scrapbooks and a lot of ideas of things to do. And one of the ideas that was new to me, was to carve stamps from corks so I gave it a try. I picked corks with the smoothest of ends, drew a simple design~star, spiral, dot, acorn, & flower~then carved out the background using my exacto knife...
 I like the fact that the image doesn't come out looking perfect because of the imperfections in the surface of the cork.
 Hope you are having a great day!


